E-commerce Automation
Product Video API: How APIs Power CSV Video Generation
Learn how product video APIs automate CSV and feed-based video generation with REST API calls, templates, and on-demand render workflows.
Published May 11, 2026

Product Video API: How APIs Power CSV Video Generation
A product video API is one of the most practical video APIs for ecommerce teams because it lets you create videos from structured product data instead of editing every SKU by hand. To create product videos from a CSV or product feed, take each row of product data, map it into a reusable video layout, submit one REST API render payload per product, and poll the render jobs until the files are ready. That is the core pattern whether you are generating one launch video, one hundred catalog promos, or channel-specific variations for paid social and marketplaces.
The important shift is that your feed becomes the source of truth for video generation. Instead of rebuilding timelines manually, you define where the product title, price, CTA, brand colors, and product media should appear in a Zvid render payload. Once that mapping exists, you can render consistent product videos whenever your catalog changes. If you are new to the platform, start with the Getting Started guide, the Authentication guide, and the JSON Structure overview so your feed pipeline matches the public API model from the beginning.
A reusable product-video template turns feed rows into consistent campaign creative.
If you already have a feed export, the first working version can be simple. A CSV row with title, price, salePrice, cta, brandColor, backgroundColor, and productImageUrl is enough to generate a solid promo video when each field maps to a known place in the scene.
Here is the API shape most teams start with when they want to generate videos programmatically and on-demand:
export ZVID_API_BASE_URL=https://api.zvid.io

curl -X POST "$ZVID_API_BASE_URL/api/render/api-key" \
  -H "Content-Type: application/json" \
  -H "x-api-key: $ZVID_API_KEY" \
  -d @render-job.json
Then poll the job until it completes:
curl "$ZVID_API_BASE_URL/api/jobs/$JOB_ID" \
  -H "x-api-key: $ZVID_API_KEY"
That flow is the same one described in the Getting Started guide. The difference for product feeds is how you generate render-job.json: you build it from structured catalog data instead of hand-authoring every scene.
Why feed-driven product video works
Feed-driven video works because product marketing is already structured. Your catalog already knows the product name, price, availability, category, promo language, and image URLs. The video layer should reuse that structure rather than forcing your team to recreate it in an editor for every SKU.
This approach is especially useful when you need:
- One branded template for many products
- Fast refreshes for sales, pricing, and inventory changes
- Different aspect ratios for paid social, marketplace ads, and PDP video slots
- Consistent CTA placement and visual hierarchy across the whole catalog
It is also easier to maintain. Your engineering or automation team can version the mapping logic, while marketing keeps control over the copy fields and brand rules that live in the feed itself.
Product video API workflow
The cleanest video workflow is: ingest feed rows, normalize the fields, map each row to a Zvid payload, submit render jobs through the endpoint, and save the resulting video URL or CDN URL back to your CMS, PIM, Shopify catalog, or ad pipeline. This is the practical difference between a one-off video editing project and video automation that can run every time product details change.
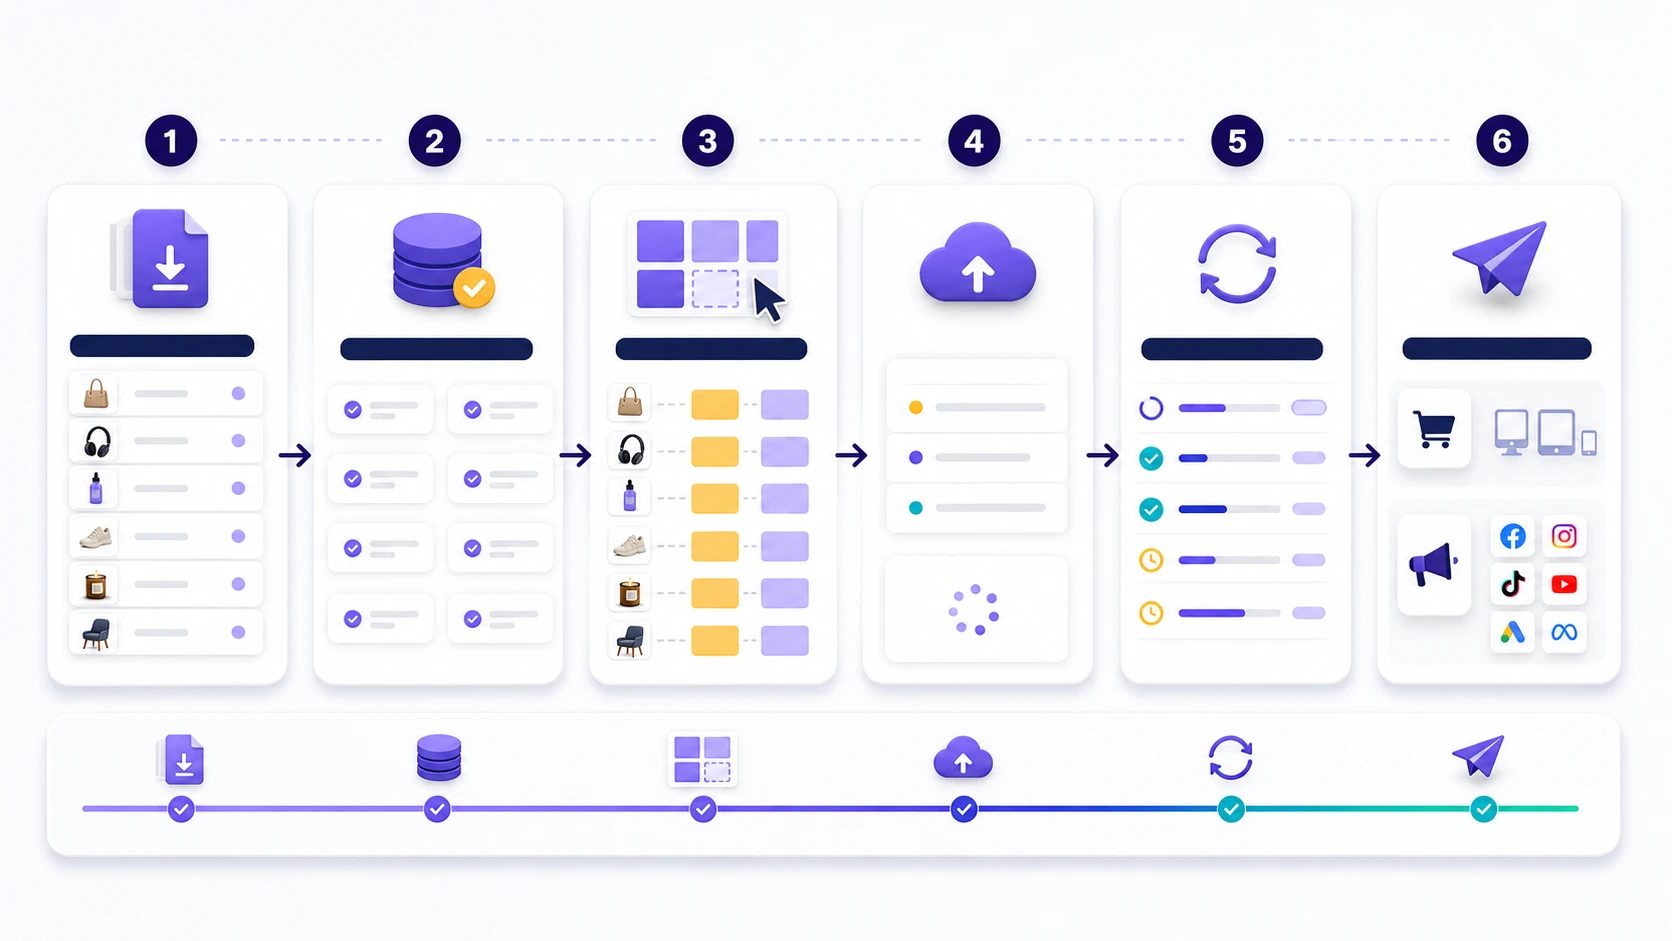
A product-feed pipeline separates data cleanup, template mapping, and rendering into repeatable steps.
In practice, the product video API pipeline looks like this:
- Parse the CSV or pull the product feed from your source system.
- Normalize fields so your template logic gets predictable values.
- Map each normalized row to scene text, colors, media, and timing.
- Submit one render job per video variation through the API.
- Poll job status and store the completed video URL where the business needs it.
If you want to use real product photos in production, the Image Elements reference shows how remote image sources work, while the Text Elements reference explains the text layer behavior you will use for titles, prices, and CTAs.
What is a product video API for video creation?
A product video API is a creation API for rendering product videos from structured inputs such as product details, image URLs, prices, badges, and calls to action. Unlike a hosting API from a platform such as Vimeo, or live streaming and transcoding APIs for uploaded media, a product video API generates new product video content from a payload.
For ecommerce teams, the key use case is repeatable video production at scale. Developers send one API call per output, track the job state, and store the finished video URL. That makes it possible to create videos for TikTok ads, marketplace listings, PDP modules, short-form explainers, thumbnails, GIFs, and localized campaign variants without rebuilding the same timeline in a UI.
REST API pipeline and API key setup
A reliable REST API implementation keeps auth, payload creation, rendering, and storage separate. First, keep your API key in server-side configuration. Next, build a payload from the product row. Then send it via API to the render endpoint and save the returned job identifier. When the job completes, write the final URL back to your product system.
That single API loop is small enough to test in a few lines of code, but it can expand into high-volume automated workflows with webhooks, retries, queue monitoring, and per render cost controls. Zvid focuses on rendering videos from templates and structured JSON rather than text prompts, avatar generation, native audio synthesis, or image-to-video generation.
Map feed columns into a reusable Zvid template
The template is the durable asset. The feed row is the changing input.
For example, a row like this:
{
  "sku": "BAG-204",
  "title": "Transit Weekender Bag",
  "price": "$129",
  "salePrice": "$99",
  "cta": "Shop the drop",
  "brandColor": "#5B3DF5",
  "accentColor": "#F5C94A",
  "productImageUrl": "https://cdn.example.com/products/transit-weekender-bag.jpg"
}
can be mapped into a render payload with a function like this:
function buildRenderJob(row) {
  return {
    payload: {
      name: `product-video-${row.sku}`,
      resolution: "instagram-story",
      duration: 10,
      frameRate: 30,
      outputFormat: "mp4",
      backgroundColor: "#0D1020",
      visuals: [
        {
          type: "IMAGE",
          src: row.productImageUrl,
          x: 260,
          y: 960,
          width: 520,
          height: 760,
          anchor: "center-center",
          resize: "contain"
        },
        {
          type: "TEXT",
          x: 760,
          y: 520,
          width: 520,
          anchor: "center-center",
          html: `<div style='text-align:left; color:#ffffff; font-size:64px; font-weight:700; line-height:1.08;'>${row.title}</div>`
        },
        {
          type: "TEXT",
          x: 760,
          y: 860,
          width: 520,
          anchor: "center-center",
          html: `<div style='text-align:left; color:${row.accentColor}; font-size:58px; font-weight:700;'>${row.salePrice || row.price}</div>`
        }
      ]
    }
  };
}
The idea is not to hard-code one product. It is to define a stable scene system and let the feed swap in the product-specific values. That becomes much easier when your payload structure follows the public docs for resolution presets, text layers, and image layers.
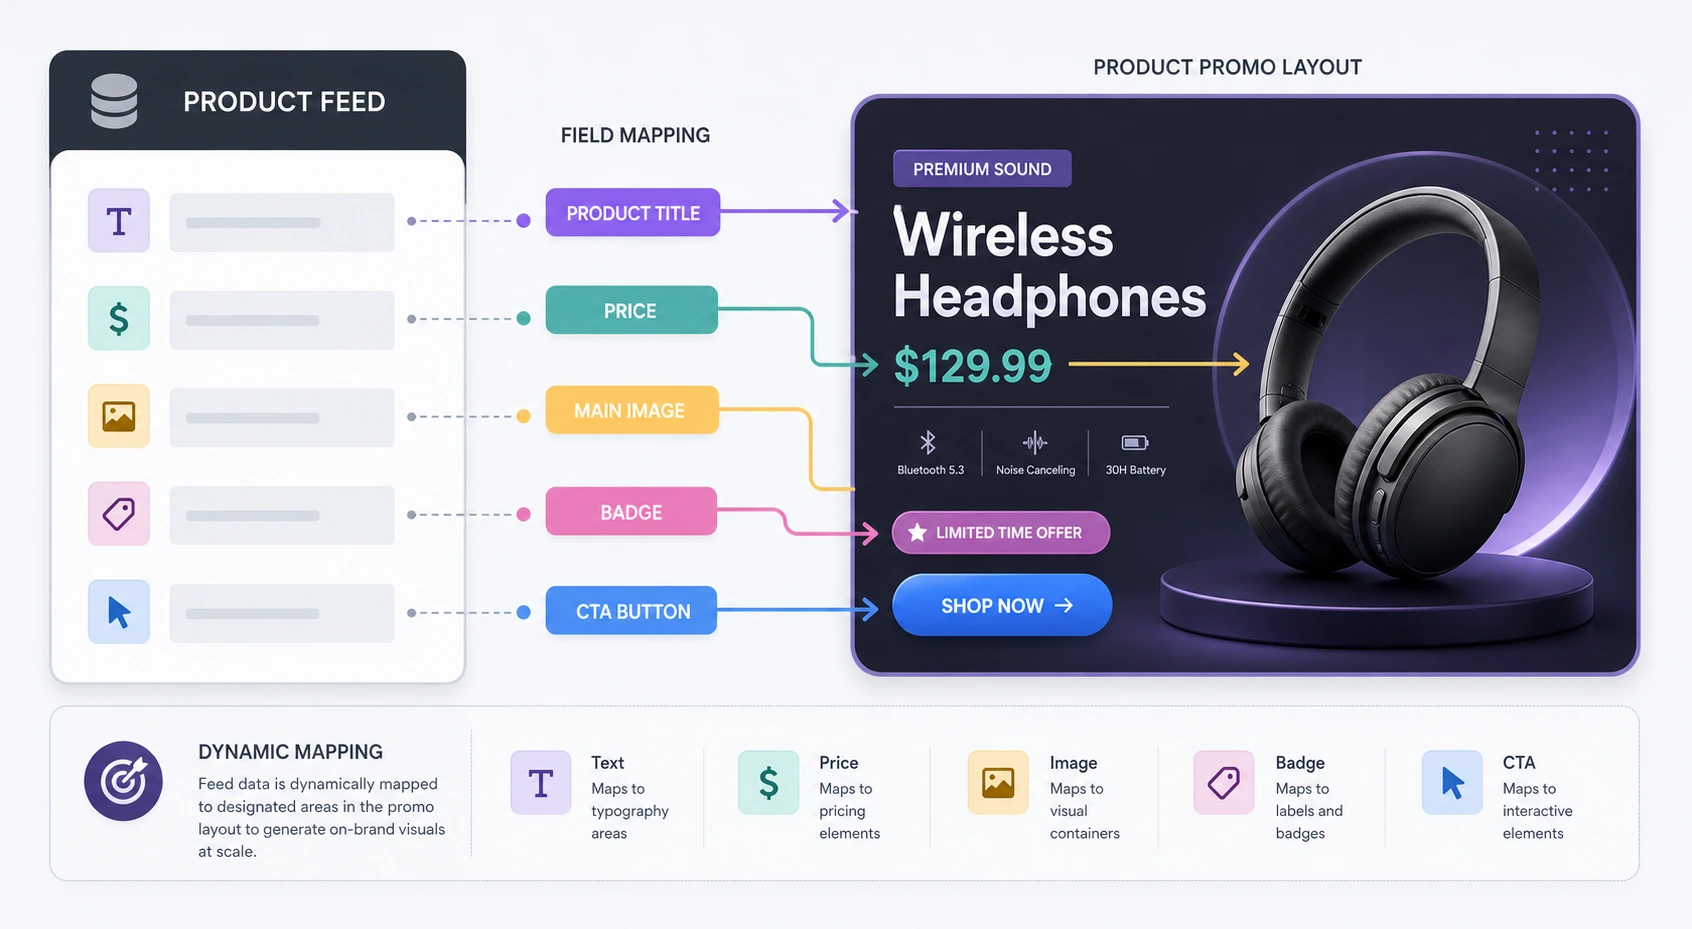
A feed-driven template works when every incoming field has a fixed role in the scene.
Example Zvid API payload for one product video
Below is a proof-friendly example payload for a single product promo. It uses SVG and TEXT elements only so you can study the scene structure clearly. In a production feed pipeline, you would usually replace the illustrated product card with a real remote product image or video clip.
{
  "name": "product-feed-demo-bag",
  "resolution": "hd",
  "duration": 10,
  "frameRate": 30,
  "outputFormat": "mp4",
  "backgroundColor": "#0d1020",
  "visuals": [
    {
      "type": "SVG",
      "width": 1280,
      "height": 720,
      "svg": "<svg width='1280' height='720' viewBox='0 0 1280 720' xmlns='http://www.w3.org/2000/svg'><defs><linearGradient id='bg' x1='0' y1='0' x2='1' y2='1'><stop offset='0' stop-color='#0d1020'/><stop offset='1' stop-color='#1f153d'/></linearGradient><radialGradient id='glowA' cx='0' cy='0' r='1' gradientUnits='userSpaceOnUse' gradientTransform='translate(1060 120) rotate(90) scale(260)'><stop stop-color='#5b3df5' stop-opacity='0.30'/><stop offset='1' stop-color='#5b3df5' stop-opacity='0'/></radialGradient><radialGradient id='glowB' cx='0' cy='0' r='1' gradientUnits='userSpaceOnUse' gradientTransform='translate(220 620) rotate(90) scale(280)'><stop stop-color='#f5c94a' stop-opacity='0.20'/><stop offset='1' stop-color='#f5c94a' stop-opacity='0'/></radialGradient></defs><rect width='1280' height='720' fill='url(#bg)'/><circle cx='1060' cy='120' r='260' fill='url(#glowA)'/><circle cx='220' cy='620' r='280' fill='url(#glowB)'/><rect x='32' y='32' width='1216' height='656' rx='34' fill='rgba(255,255,255,0.035)' stroke='rgba(255,255,255,0.08)'/></svg>"
    },
    {
      "type": "SVG",
      "x": 330,
      "y": 370,
      "width": 420,
      "height": 520,
      "anchor": "center-center",
      "track": 3,
      "enterBegin": 0.2,
      "enterEnd": 0.9,
      "enterAnimation": "smoothleft",
      "exitBegin": 9.2,
      "exitEnd": 9.8,
      "exitAnimation": "fade",
      "svg": "<svg width='420' height='520' viewBox='0 0 420 520' xmlns='http://www.w3.org/2000/svg'><defs><linearGradient id='card' x1='0' y1='0' x2='1' y2='1'><stop offset='0' stop-color='rgba(255,255,255,0.12)'/><stop offset='1' stop-color='rgba(255,255,255,0.05)'/></linearGradient><linearGradient id='bag' x1='0' y1='0' x2='1' y2='1'><stop offset='0' stop-color='#6f58ff'/><stop offset='1' stop-color='#f5c94a'/></linearGradient></defs><rect x='0.5' y='0.5' width='419' height='519' rx='32' fill='url(#card)' stroke='rgba(255,255,255,0.14)'/><rect x='36' y='34' width='126' height='34' rx='17' fill='rgba(245,201,74,0.14)' stroke='rgba(245,201,74,0.34)'/><text x='99' y='56' text-anchor='middle' fill='#f5c94a' font-size='15' font-family='Inter' font-weight='700'>NEW ARRIVAL</text><rect x='78' y='108' width='264' height='272' rx='28' fill='rgba(10,16,31,0.40)' stroke='rgba(255,255,255,0.10)'/><path d='M150 198 C150 160 178 138 210 138 C242 138 270 160 270 198' fill='none' stroke='url(#bag)' stroke-width='18' stroke-linecap='round'/><rect x='126' y='188' width='168' height='150' rx='34' fill='url(#bag)'/><rect x='156' y='224' width='108' height='18' rx='9' fill='rgba(255,255,255,0.22)'/><rect x='106' y='408' width='208' height='20' rx='10' fill='rgba(255,255,255,0.11)'/><rect x='132' y='442' width='156' height='16' rx='8' fill='rgba(245,201,74,0.18)'/></svg>"
    },
    {
      "type": "TEXT",
      "x": 852,
      "y": 148,
      "width": 520,
      "anchor": "center-center",
      "track": 8,
      "enterBegin": 0.4,
      "enterEnd": 1,
      "enterAnimation": "fade",
      "exitBegin": 9.1,
      "exitEnd": 9.7,
      "exitAnimation": "fade",
      "html": "<div style='text-align:left; color:#f5c94a; font-size:18px; font-weight:700; letter-spacing:1px;'>WEEKEND TRAVEL ESSENTIAL</div>"
    },
    {
      "type": "TEXT",
      "x": 852,
      "y": 268,
      "width": 520,
      "anchor": "center-center",
      "track": 10,
      "enterBegin": 0.6,
      "enterEnd": 1.3,
      "enterAnimation": "fade",
      "exitBegin": 9,
      "exitEnd": 9.6,
      "exitAnimation": "fade",
      "html": "<div style='text-align:left; color:#ffffff; font-family:Poppins; font-size:54px; font-weight:700; line-height:1.08;'>Transit Weekender Bag</div>"
    },
    {
      "type": "TEXT",
      "x": 852,
      "y": 404,
      "width": 520,
      "anchor": "center-center",
      "track": 9,
      "enterBegin": 0.9,
      "enterEnd": 1.5,
      "enterAnimation": "fade",
      "exitBegin": 8.9,
      "exitEnd": 9.5,
      "exitAnimation": "fade",
      "html": "<div style='text-align:left; line-height:1.3;'><div style='color:#9ea7d8; font-size:22px; margin-bottom:10px;'>Carry-on sized. Structured silhouette. Limited seasonal colorway.</div><div style='color:#f5c94a; font-size:52px; font-weight:700;'>$99 <span style='color:#8a92bf; font-size:24px; text-decoration:line-through;'>$129</span></div></div>"
    },
    {
      "type": "TEXT",
      "x": 852,
      "y": 534,
      "width": 420,
      "anchor": "center-center",
      "track": 8,
      "enterBegin": 1.2,
      "enterEnd": 1.8,
      "enterAnimation": "fade",
      "exitBegin": 8.8,
      "exitEnd": 9.4,
      "exitAnimation": "fade",
      "html": "<div style='display:inline-block; background:rgba(91,61,245,0.20); border:1px solid rgba(91,61,245,0.42); border-radius:26px; padding:16px 24px; color:#ffffff; font-size:22px; font-weight:700;'>Shop the drop</div>"
    },
    {
      "type": "TEXT",
      "x": 640,
      "y": 654,
      "width": 1080,
      "anchor": "center-center",
      "track": 6,
      "enterBegin": 1.4,
      "enterEnd": 2,
      "enterAnimation": "fade",
      "exitBegin": 8.7,
      "exitEnd": 9.3,
      "exitAnimation": "fade",
      "html": "<div style='text-align:center; color:#c4c9ea; font-size:16px;'>Mapped from feed fields: title, list price, sale price, badge, CTA, and brand colors.</div>"
    }
  ]
}
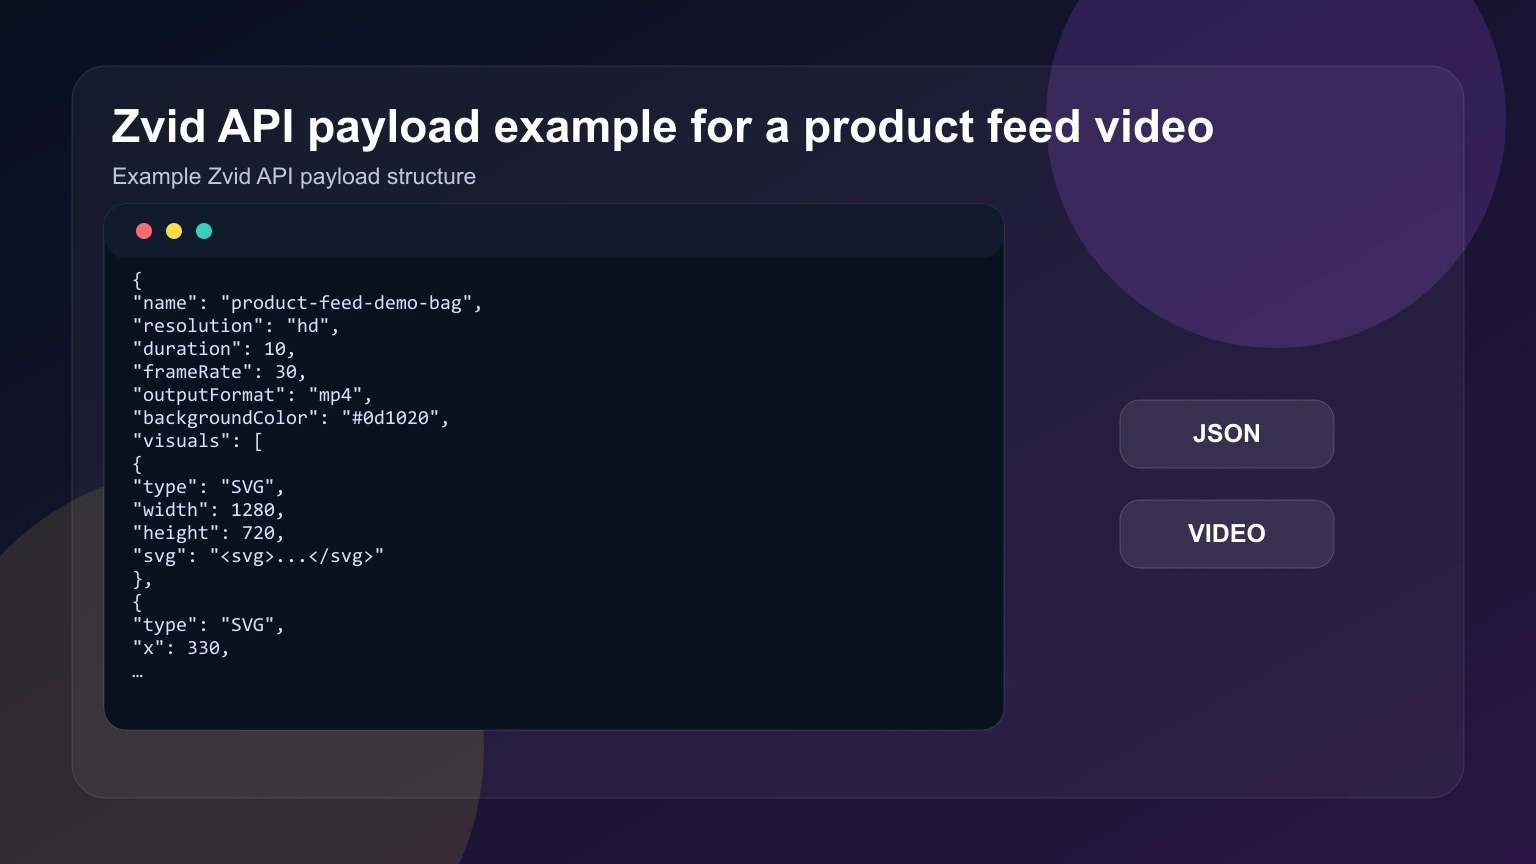
The same payload structure can be reused for every row in your catalog.
This is also a good place for a mid-funnel CTA: if your team already has product data in a spreadsheet, feed, or database table, test one product row first. Build a single reusable template, send one render job, confirm the layout, and then scale from there.
Video editing vs feed-driven rendering
The decision is mostly about volume and repeatability.
- Manual editing is fine when you need a handful of one-off launch videos.
- Feed-driven rendering is better when the creative structure stays mostly the same while the product data changes often.
- A template plus API flow gives engineering teams a way to control consistency, retries, and output destinations.
- A feed-driven system also makes localization and promotion-specific variants much easier because the text and pricing already live in structured fields.
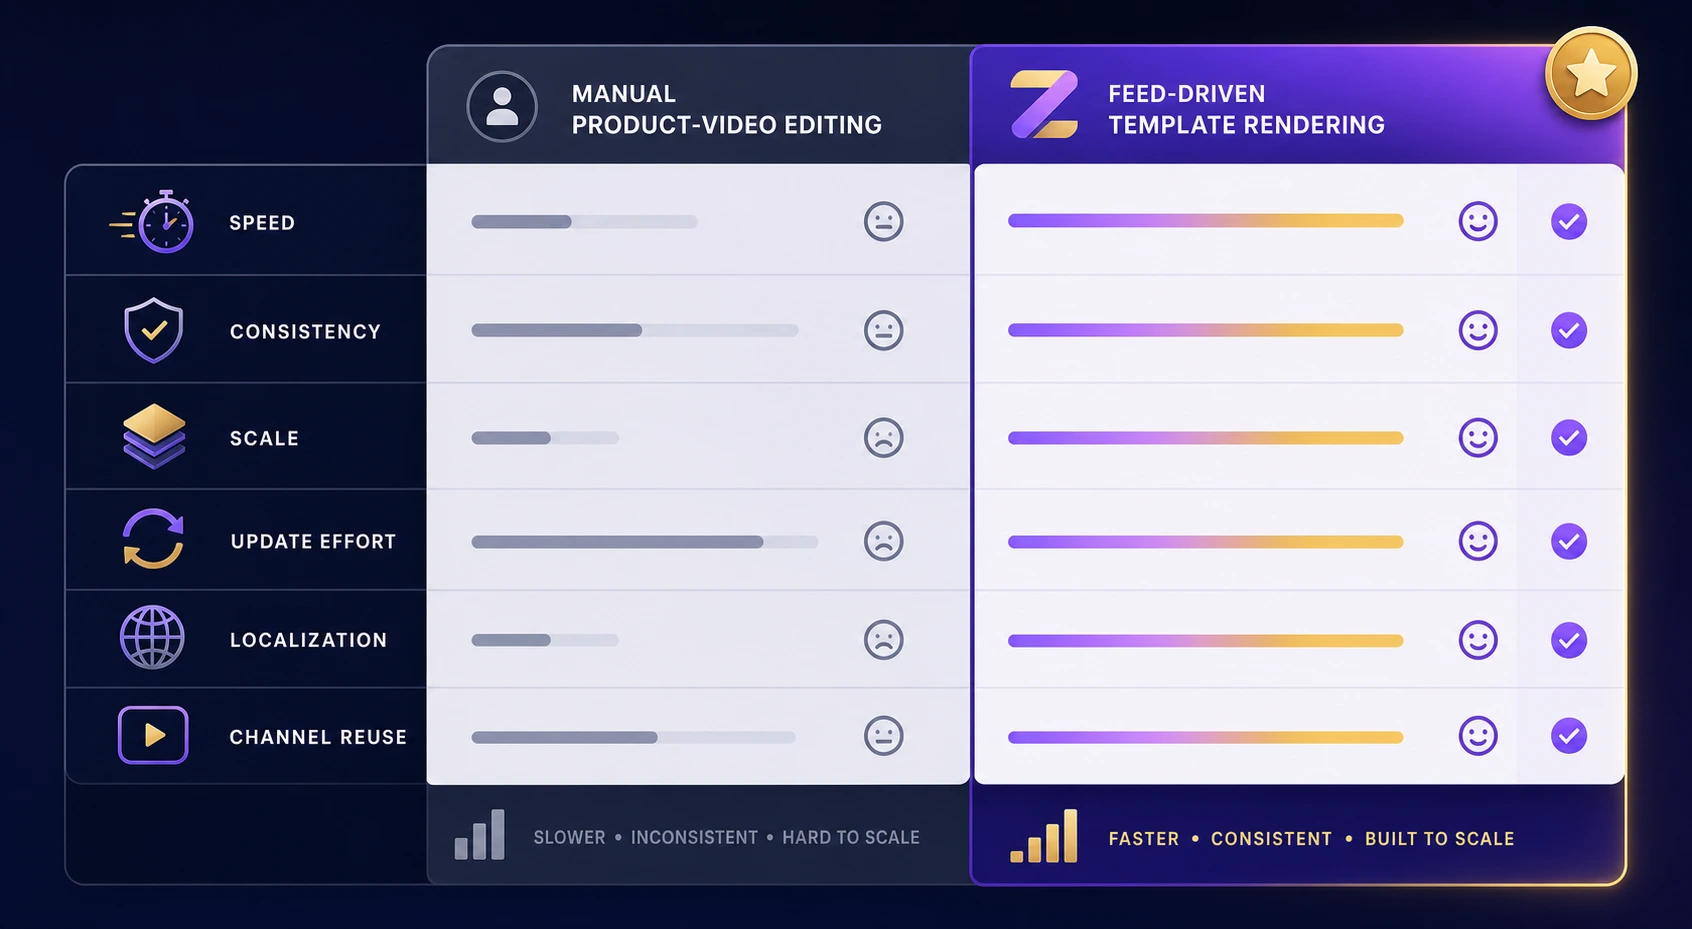
Product feeds outperform manual editing when the scene stays stable and the data changes often.
Video generation API use case checklist
When you compare video APIs, look for the part of the workflow each platform actually owns. Some APIs are built for upload, playback, live streams, and cloud infrastructure. Others are AI video generator tools for text to video, image generation, or prompt-based creative output. For feed-driven ecommerce, you usually need a video generation API that is fully customizable, accepts product data programmatically, supports videos using real product URLs, and returns a finished asset your app can store.
A practical checklist is:
- Can the API generate videos from product details without manual video editing?
- Can one API call create a predictable render from a saved layout?
- Does the endpoint support image URLs, text layers, brand colors, and output presets?
- Can the pipeline support high-volume catalog refreshes and automated workflows?
- Can the result be routed to a CDN, ad platform, CMS, or Shopify workflow?
AI video generator, no-code, and ecommerce integrations
Developers often start with direct API calls, then connect the same workflow to no-code tools when marketing or operations teams need control. A product feed pipeline can be triggered from n8n, Zapier, a Shopify export, a PIM change, or a scheduled catalog job. Tools such as Creatomate, HeyGen, and ElevenLabs solve adjacent creation problems, but the right product video API depends on whether you need configurable product layouts, AI features, text prompts, avatar clips, or structured rendering from CSV data.
Zvid fits the structured rendering side: define the layout, inject feed values, render the asset, and send the completed video directly to the destination that needs it.
Common mistakes
The most common failure is trying to automate before the template rules are clear. If the title box, price placement, offer badge, and CTA style are still changing every day, the feed mapping will stay unstable.
Other mistakes show up repeatedly:
- Treating the CSV as clean input when fields actually need normalization first
- Letting title length vary wildly without defining truncation or line-break rules
- Mixing channel formats without deciding when to use
instagram-story,instagram-post,youtube-video, or another supported preset - Hard-coding promotional copy in the template instead of sourcing it from the feed
- Using a template that depends on manual visual tweaks for every product
Before scaling, decide which fields are required, which are optional, and what the fallback behavior should be when an image, sale price, or CTA is missing.
When to use Zvid for video automation
Zvid makes sense when you want the video itself to be a programmatic output of your product data.
Use Zvid when you need:
- Reusable scene templates for many products or offers
- API-based render submission and job polling in your own pipeline
- Flexible control over text, layout, timing, and media placement
- Different outputs for paid social, lifecycle campaigns, marketplaces, or storefronts
Do not over-engineer it for a tiny catalog with rare changes. The advantage appears when you want a repeatable system rather than a one-time edit.
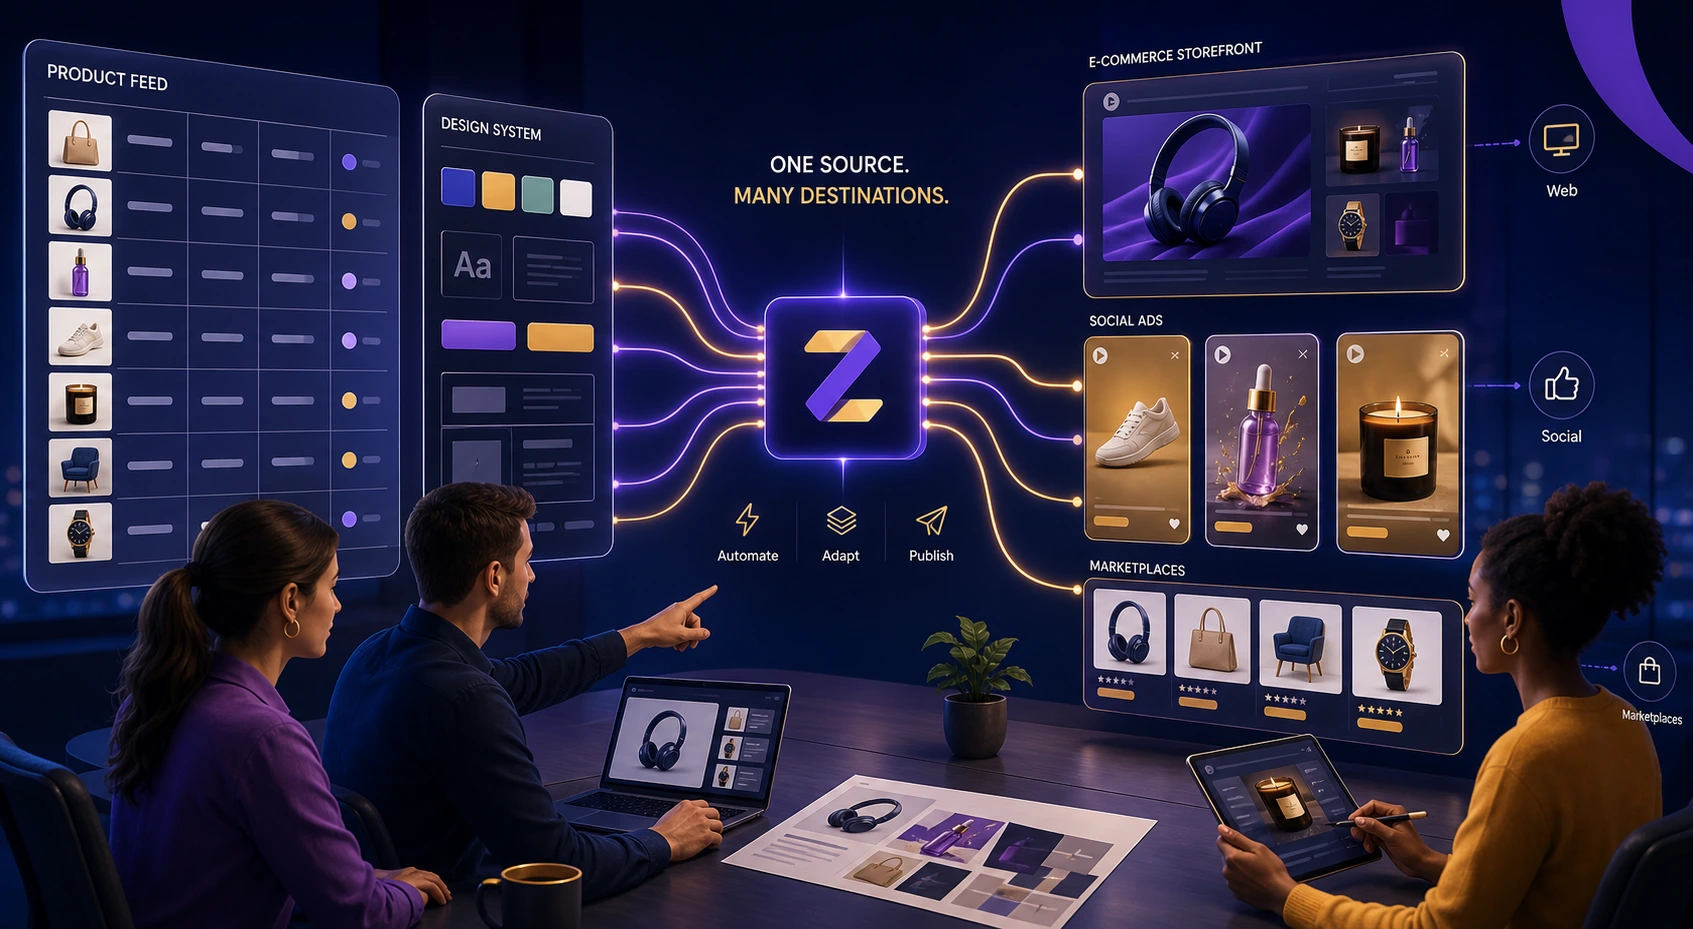
One shared feed can power storefront, paid social, and marketplace video variants.
For implementation detail, the most useful internal docs to keep open are the JSON Structure overview, Text Elements reference, Image Elements reference, and Resolution Presets reference. Those pages define the scene building blocks you will reuse as your catalog grows.
If you want to prove the workflow quickly, start with one row, one template, and one destination format. After that, add batch submission, channel variants, and post-render routing back into your commerce stack.
FAQs
Which type of video API do I need?
If you need to host or stream uploaded files, choose a hosting or live streaming API. If you need text-to-video or image-to-video generation from prompts, choose an AI video generator API. If you need to generate product videos from catalog data, choose a product video API that accepts structured fields, images, and layout rules.
Can I automate video creation with a video API?
Yes. A video API can automate video creation when your application can build the payload, call the endpoint, poll for completion, and store the result URL. The strongest use case is a repeatable layout with changing inputs.
Can I create many videos from one CSV file?
Yes. The usual pattern is to parse the CSV into rows, map each row into a render payload, and submit one API job per output. The template stays stable while the product fields change.
Do I need a different template for every product category?
Not always. Many teams start with one universal promo template and then split into category-specific templates only when aspect ratios, copy density, or media framing diverge too much.
Does this work with Meta, Google, TikTok, and other ad platforms?
Yes, if your pipeline renders the right aspect ratio and stores the finished video URL where your ad or product workflow can access it. For example, one feed can produce vertical TikTok variants, square marketplace assets, and landscape product explainers.
Can I use real product images instead of illustrated placeholders?
Yes. In production, you would normally use remote image URLs with Zvid's Image Elements. The example payload here keeps the scene self-contained so the structure is easier to study and adapt.
Structured product data is already most of the work. The leverage comes from turning that structure into a reusable video template and a reliable render workflow. If that matches your use case, test one product row with Zvid, confirm the layout, and then scale the same template across the rest of your feed.