Tutorials
Shopify Product Video
Create a Shopify product video from your existing photos, prices and details. Follow the n8n template, preview the result and attach the MP4 to your product, or use the Node.js script.
 By Mina RamzyPublished
Your Shopify product pages already hold most of what a product video needs: photos, a title, a price and a few useful details. The repetitive work is placing those details into the same design, exporting a video, then matching it back to the right product.
This Shopify product video workflow handles that sequence with n8n and Zvid. It selects eligible products without usable video, builds a branded vertical video for each one and returns the finished MP4s for review. An optional branch attaches the videos to their matching Shopify products.
This guide uses n8n for the main walkthrough. If you prefer a script, the Prefer Node.js? section provides the same product mapping and video design in a runnable project.
See what the workflow creates
$35 · 12.6 seconds · 1080 × 1920 · no audio
Download the sample MP4 ↓
One product, three scenes
A clear product introduction, a closer look at its details, then a price and call to action. The same design can be filled with a different catalog record for each video.
Sample input: Clay Pocket Oversized Tee, $35, sizes S, M, L and XL.
Output: a vertical MP4 ready to watch, download and review.
This fictional product example uses one terracotta-shirt photo, reused across three scenes: introduce the product, show its details, then finish with the price and a call to action. Products with more photos can fill the design's four image positions separately. The workflow uses existing product images; it does not generate new footage or write product claims with AI.
1. Get the workflow and prepare your accounts
- 1Select productsRead Shopify and skip products with usable video.
- 2Preview the designCheck the first product and the credit estimate.
- 3Render and reviewCreate a separate MP4 for each selected product.
- 4Use the videosDownload them or enable the Shopify upload branch.
Open Create and publish Shopify product videos with Zvid on n8n, or browse its Zvid workflow page.
Use the maintained JSON below for this walkthrough. The recording and screenshots show an earlier version with HTTP-based Zvid steps and different defaults. The current download uses the Zvid community node for validation, editor drafts, bulk rendering and batch status. Follow the written setup and defaults below; its node names match the download.
Watch the complete walkthrough
See the full n8n workflow
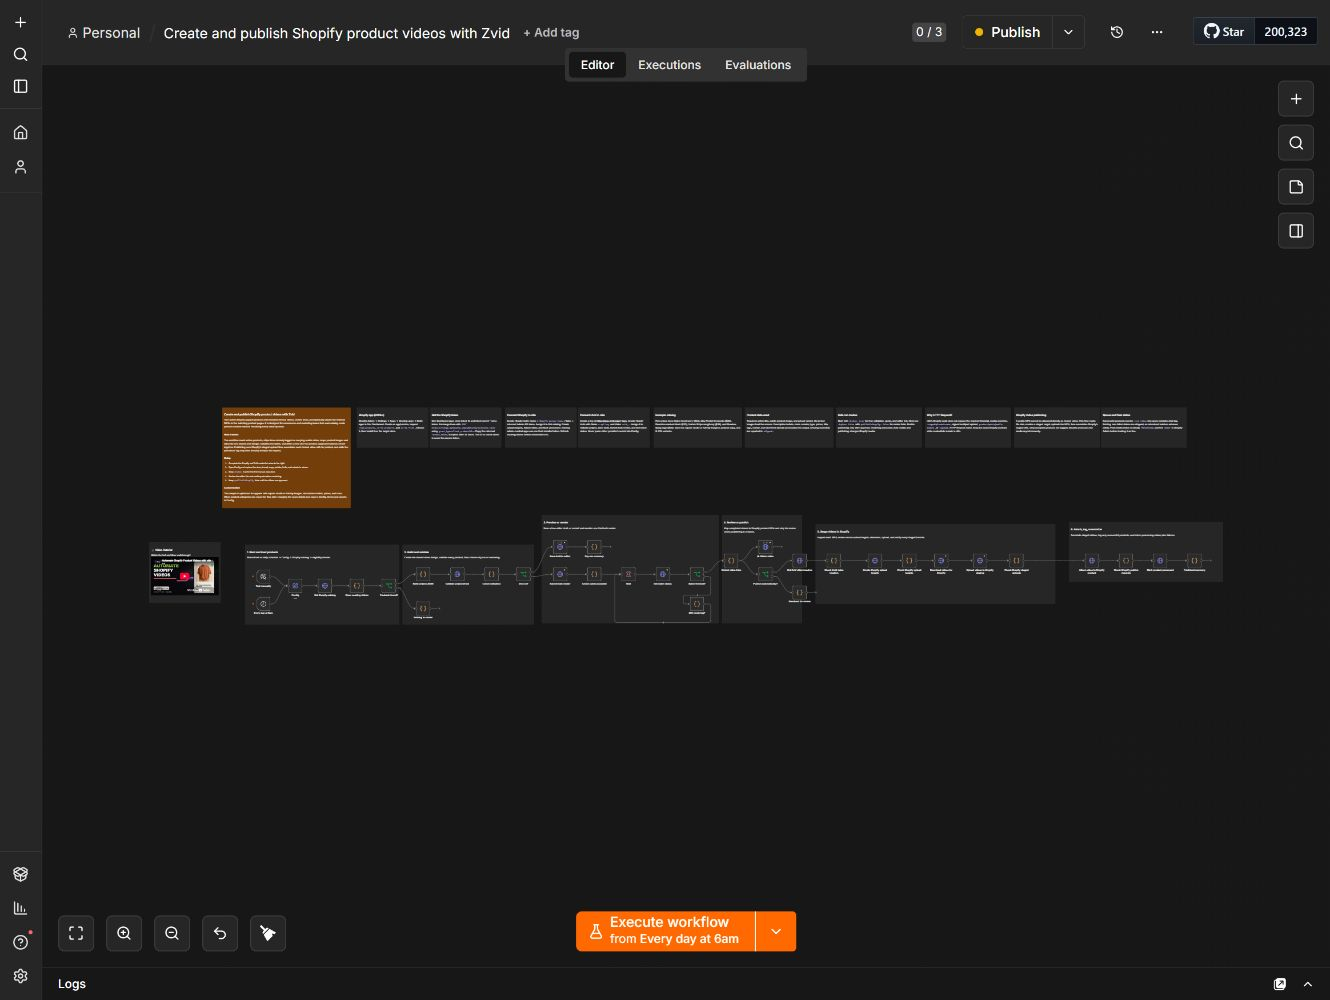
You need:
- An n8n workspace where you can install the Zvid integration and manage credentials.
- A Zvid account, an API key and enough credits for the videos you choose to render.
- A Shopify store and an installed app with an Admin API access token. Reading products requires
read_products; optional video uploads also requirewrite_productsandwrite_files. - At least one active product with a title, a public image, a priced variant and no usable video. Use product media you have permission to publish.
If you want to start from a spreadsheet without connecting Shopify or n8n, follow Create product videos from a CSV without coding.
2. Install Zvid, import the workflow and connect credentials
In n8n, open Settings → Community nodes and install @zvid/n8n-nodes-zvid before configuring Zvid credentials. A workspace owner or administrator may need to do this. On n8n Cloud, an owner or administrator can open the nodes panel with +, search for Zvid, select the verified community node and choose Install. See the Zvid integration guide for the supported integration.
Create an empty workflow, open its workflow menu, choose Import from File, and select shopify-catalog-videos.n8n.json. Keep the workflow inactive while you configure it.
Connect Zvid
- Sign in at app.zvid.io/api-keys.
- Click Create API key, enter a unique name such as
Shopify product videos, and create the key. Copy the complete value before closing the dialog. - In n8n, open Validate project (free) and create a Zvid API credential. Enter that key and keep the base URL as
https://api.zvid.io. - Select the same credential on Save draft to editor, Submit bulk render and Get batch status.
Keep the key in credentials, not in Config or the exported JSON. The API key guide explains the create-and-copy flow.
Connect Shopify
You need an Admin API access token, not the Client ID or Client secret shown in your app settings. For a store and app in your own Shopify organization, obtain one as follows:
- Open the Shopify Dev Dashboard, choose your organization, then Apps → Create app → Start from Dev Dashboard. Name the app and create it. You need app-development permissions.
- In Versions, create a version and add
read_products. If you will attach videos, also addwrite_productsandwrite_files. For this background integration, use Shopify's default app URL,https://shopify.dev/apps/default-app-home, then Release the version. - On the app's home page, choose Install app, select your store and confirm installation. If you add scopes later, release a new version and approve the new access on the store.
- Open the app's Settings and copy its Client ID and Client secret into private environment variables. Shopify's Dev Dashboard setup guide illustrates these screens.
- Exchange those credentials for an access token using the request below. Copy the returned
access_token; also noteexpires_inand confirm the returnedscopeincludes the access you need.
Run this in a terminal with SHOPIFY_SHOP, SHOPIFY_CLIENT_ID and SHOPIFY_CLIENT_SECRET already set privately. SHOPIFY_SHOP is only the subdomain, for example acme, without .myshopify.com. This example uses Bash syntax; Windows users can use Git Bash or the Node.js example in Shopify's token-request guide.
curl --request POST \
  "https://${SHOPIFY_SHOP}.myshopify.com/admin/oauth/access_token" \
  --header "Content-Type: application/x-www-form-urlencoded" \
  --data-urlencode "grant_type=client_credentials" \
  --data-urlencode "client_id=${SHOPIFY_CLIENT_ID}" \
  --data-urlencode "client_secret=${SHOPIFY_CLIENT_SECRET}"
Keep the response private. Do not paste the Client secret or token into the workflow JSON, a screenshot or a shared execution log. This grant works only when the app and store belong to the same Shopify organization. For a client's store in another organization, follow Shopify's app authentication guide instead.
Now open Get Shopify catalog in n8n and create a Header Auth credential with:
| Field | Value |
|---|---|
| Name | X-Shopify-Access-Token |
| Value | Your installed app's Admin API access token |
Choose that same credential on Create Shopify upload targets, Attach video to Shopify product and Mark product processed. Select Get Shopify catalog and use Execute step to confirm that the credential can read products before starting the full workflow.
Renew a client-credentials token by repeating the same token request; that grant does not return a refresh token. Other Shopify authorization flows have different lifetimes. Check Shopify's token lifetime reference. A 401 can mean the token expired; a 403 can indicate missing scopes or store access. Check the token, installation and permissions before retrying.
The Shopify steps use HTTP Request nodes for the required GraphQL and staged-upload operations. The Zvid steps use the installed Zvid node.
3. Choose a small product selection
Open Config. Update these fields while keeping the remaining design settings for the first test:
| Setting | First-run value | What it controls |
|---|---|---|
shopDomain |
Your store subdomain | Use acme for acme.myshopify.com, without the protocol or suffix. |
website |
Your storefront address | The address displayed in the video. |
brandName |
Your brand | The name displayed in the shared design. |
shopifyProductQuery |
status:active -tag:zvid-video |
Active products without the processed tag. |
scanLimit |
100 |
How many candidates to inspect on one catalog page. |
maxProducts |
1 |
Start with one eligible product to review the layout. The shipped value is five. |
dryRun |
true |
Validate and save the first product as an editor draft without rendering. |
publishToShopify |
false |
Keep Shopify product media unchanged. |
The workflow excludes products with a hosted or external video whose status is not failed. It also reports products missing required input instead of rendering empty cards. A product does not need four photos: the available images are reused when fewer exist.
For the sample tee, the mapping looks like this:
| Catalog input | Video result |
|---|---|
Clay Pocket Oversized Tee |
Product name in the opening and closing scenes |
First variant price 35.00 |
Displayed price $35 |
| One terracotta-shirt image | The same photo reused in the design's image positions |
| Oversized silhouette; chest pocket detail; terracotta color | Three details in the middle scene |
| Sizes S, M, L and XL | S · M · L · XL |
Prices come from the first returned variant. Size labels come from variant options, not an inventory availability check. Review the output if variants have different prices or some sizes are unavailable.
4. Preview the first product and check the estimate
Click Execute workflow to run the manual trigger. With dryRun: true, the run reads Shopify, builds the batch, validates the first product and attempts to save that resolved design in the Zvid editor.
Open Dry-run summary. Check productsToRender, videosPlanned, skipped, warnings, creditsPerVideo and totalCredits. Open editorLink to inspect the draft and play its timeline. If the link is empty, inspect Save draft to editor for an error; a credit quote alone does not mean a draft was saved.
Check the whole video: product name, image framing, details, price, size labels and the final message. An editor draft is a preview, not a finished MP4. Changes made to that saved draft are not automatically copied back into n8n: adjust Config or Build project JSON if you want subsequent workflow renders to use a different design.
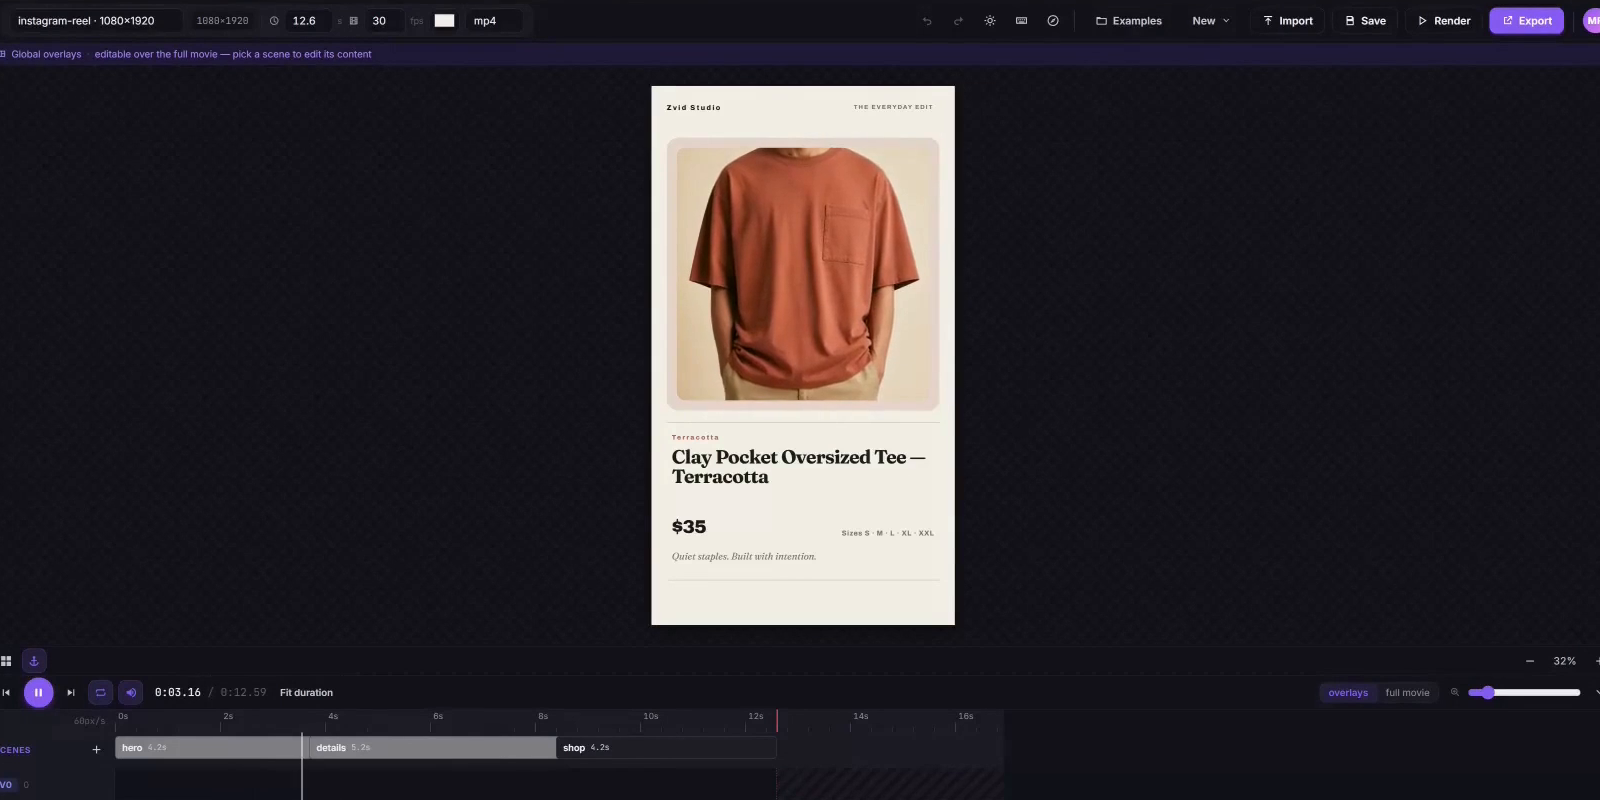
Validation does not queue a render or reserve credits. In this n8n workflow, the batch estimate multiplies the first product's quote by the selected product count. That is useful for the shared fixed-duration design, but it is not an individual preview of every product or a spending cap.
5. Render, watch and save the videos
When the preview looks right, set dryRun to false and leave publishToShopify as false. Execute the workflow again. It reads the catalog again, validates the design and submits the selected products as a bulk render. Each product gets its own video.
Keep the execution record. Check batch accepted contains the accepted bulkId and job mapping. Get batch status checks progress at the configured interval, which is ten seconds by default.
When completed media is available, open ▶ Watch video → Binary → data → View. Select each output item to inspect its video. Use the binary download control to save the MP4. You can also open a videoUrl from Rendered for review, then save it from the browser's video controls.
In Rendered for review, check the product IDs, titles, product-page URLs and video URLs together. The workflow matches results by the original submission index and Shopify product ID, so two products with similar names do not depend on title matching.
Review renderFailures as well as successful videos. A batch can return usable outputs even when some products fail. If polling times out, the renders can continue in Zvid. Check the saved batch in app.zvid.io before starting another execution. Retry guidance explains why an uncertain submission should not be repeated blindly.
Download accepted videos before their output links expire. The on-screen storefront address is ordinary video text: put the working shop link in the surrounding product page, social post or ad destination.
6. Decide how videos reach Shopify
There are two ways to use the completed files:
- Review each result first: keep
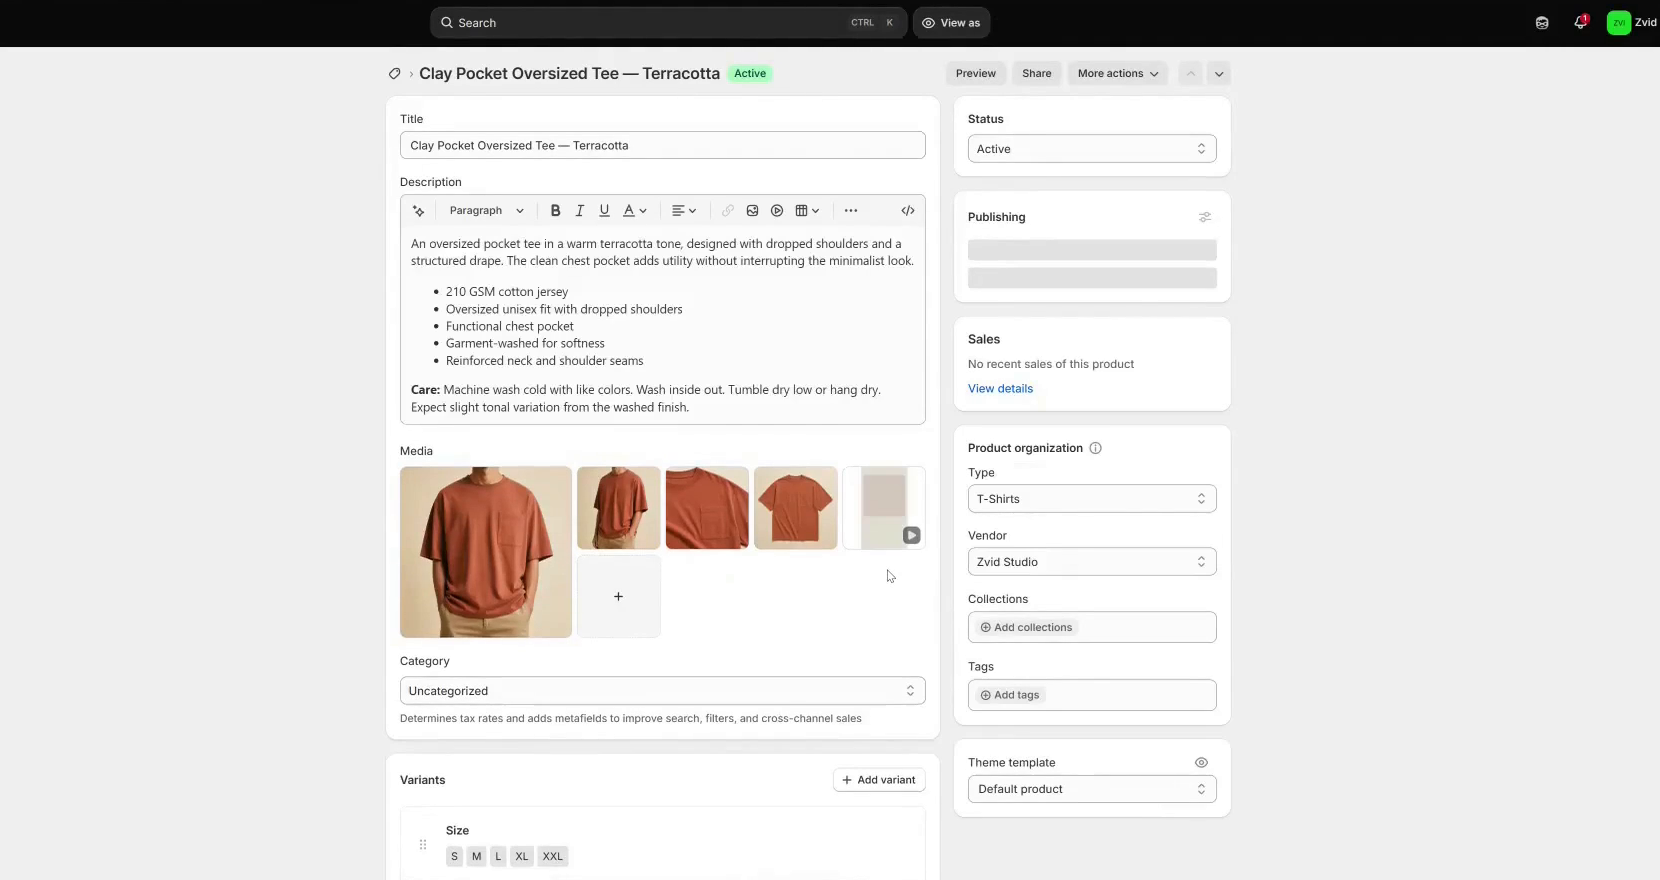
publishToShopify: false, download the accepted MP4, open Products in Shopify Admin and select the matching product. In Media, choose Upload new and select the video. Confirm that Shopify finishes processing it. See Shopify's product media instructions. - Upload as part of a future workflow run: set
publishToShopify: truebefore that run. Completed videos are uploaded and attached automatically; there is no approval pause between rendering and uploading.
Do not rerun the whole n8n workflow merely to upload a batch you already rendered. A new execution can select those products and spend credits again. Use the reviewed files for manual attachment, or adapt the publishing branch to consume the saved results.
The automatic branch stages the MP4 upload, associates it with the matching product, then adds the zvid-video tag after Shopify accepts the association. It does not replace existing titles, descriptions, prices or images. Accepted media initially reports PROCESSING; confirm it becomes ready in Shopify Admin. The workflow does not wait for Shopify's video processing to finish.
If an upload or association fails, inspect the returned product and video URL before retrying. If association succeeds but tagging fails, inspect the existing product media and repair the tag instead of uploading the video again.
Customize the design, then increase the batch
Set your copy, colors, fonts and displayed storefront in Config. The sample is written for apparel, with labels such as CUT · CLOTH · FINISH. Change those labels and review the fallback description text before using another product category. Product titles and tags can also select product-specific accent colors, so check more than one item after rebranding.
The default musicUrl is empty. Add a publicly accessible audio file if you want music and have the rights to use it. Keep product images accessible throughout rendering.
Once one product works, try a small group with a long title, fewer photos and a different price. Increase maxProducts only after reviewing those edge cases. The imported workflow has a daily 6:00 AM trigger; enable it only after checking the workflow timezone, token refresh and product selection.
This workflow creates videos for products that need them; it does not automatically update existing videos. It scans one page per run, with a maximum scanLimit of 250, and does not follow subsequent pages. Review-only runs do not add processed tags, so another run can select the same products. Narrow the query as your queue changes. If a product's price or photos change later, plan a replacement video and update the old media yourself.
Costs and practical limits
The included 12.6-second, 1080 × 1920 sample received a 13-credit validation quote. Five videos at that same quote would total 65 credits. This is illustrative batch arithmetic; use the current quote for your selected design and products.
Zvid credit calculation depends on resolved duration and resolution. Validation and editor previews do not consume render credits. Paid renders, n8n hosting and any other services have their own costs and limits.
The workflow does not generate new product photography, check inventory availability, publish social posts or choose the best creative. Your team still owns product accuracy, media rights, creative review and replacement of outdated videos.
Prefer Node.js?
Use the standalone script if you want to run the workflow from your own terminal or scheduler. It uses the official @zvid/sdk and the same catalog mapper and design as the n8n export. Both links below contain the same revision.
Install Node.js 20.12 or newer, extract the ZIP, then open a terminal in its shopify-catalog-videos folder:
npm ci
npm run check
npm test
npm run offline
The offline command builds the sample project data without credentials or API calls. It does not render a video. To use your store, copy .env.example to .env, fill in ZVID_API_KEY, SHOPIFY_ACCESS_TOKEN and SHOPIFY_SHOP_DOMAIN, then edit the branding and product selection in config.json. Use the same subdomain and token rules as the n8n setup.
npm run dry-run
npm start -- --max-credits 100
The first command validates every selected product without spending render credits. The second renders only if the sum of those quotes fits the example's 100-credit ceiling. Results and completed video URLs are saved in out/live/result.json; open the URLs to watch and download the MP4s. Keep that file private because live runs contain your catalog identifiers and output links.
After an interrupted wait, use npm start -- --resume to retrieve the accepted batch without submitting another one. After reviewing completed live results, npm start -- --resume --publish-to-shopify can upload those existing videos. This is different from rerunning the full n8n workflow.
The script does not create an editor draft or refresh Shopify tokens. Its README includes the exact commands for reproducing the supplied tee, timeout recovery and optional publishing. Fixture runs cannot publish to Shopify.
Start with one product
Download the maintained n8n export, connect your credentials and preview one product with dryRun: true. Once its photos, copy and price look right, render it for review. Expand the selection only after you have a result you would be comfortable adding to your store.
Frequently asked questions
Can I create Shopify product videos without writing JavaScript?
Yes. Import the n8n workflow, install the Zvid community node, connect credentials and edit the Config fields. You do not need to edit its code nodes for the supplied design, but you do need Shopify app access and familiarity with n8n credentials.
Does the Shopify product video workflow render by default?
Yes. The maintained download has dryRun: false, so execution renders videos and spends credits. Set dryRun: true before your first setup check to get a validation quote and first-product editor draft without rendering. publishToShopify: false controls store uploads, not render spending.
Will the workflow replace videos when a Shopify price changes?
No. The workflow skips products with usable video or the processed tag and does not update existing MP4s. A price or image change needs a deliberate replacement run and removal or replacement of the old media wherever it is used.
Does turning on publishToShopify upload videos from my previous n8n run?
No. Starting the full workflow again reads the catalog and can create another paid batch. Upload the previously reviewed files manually or use a publishing flow that consumes the saved results. The Node.js example separately supports resuming its saved run with --publish-to-shopify.
Why does Shopify reject my Client ID or Client secret as an access token?
Shopify API requests require the installed app's Admin API access token in X-Shopify-Access-Token. A Client ID and Client secret are used to obtain a token through the appropriate authorization flow; neither is the token itself. Also check the store subdomain, app scopes and token expiry.
Can this template process all my Shopify products in one run?
No. Each run reads one page of candidates, capped at 250, and selects up to maxProducts eligible products. Use smaller targeted queries and review queue progress. The workflow does not traverse every catalog page automatically.
Can I use the Node.js script without n8n?
Yes. The standalone project runs with Node.js and the official Zvid SDK. It includes the n8n export as the source of its shared mapper and design, but it does not need a running n8n server. Offline sample preparation needs no credentials; live validation and rendering need a Zvid key, and a live Shopify catalog needs an Admin API token.
For help with Zvid, visit https://zvid.io/contact.