Developer Guides
JSON to Video API: Convert JSON to Video with Zvid
Convert JSON to video with Zvid's API. Learn templates, structured JSON, POST requests, job polling, and video automation workflows for developers.
Published May 12, 2026

JSON to Video API: Convert JSON to Video with Zvid
A JSON to video API lets you describe a video as structured JSON data, submit that payload to a rendering endpoint, and receive a finished video file when the job completes. If you need to convert JSON to video for templates, localization, product feeds, campaign variants, or app-generated clips, that is usually a better fit than rebuilding timelines manually in a GUI.
The core workflow is simple: verify your API key, submit a payload with a POST request to /api/render/api-key, save the returned jobId, and poll GET /api/jobs/{id} until the render completes. Zvid documents that exact flow in the Getting Started guide, the Authentication guide, and the JSON Structure overview. If you are evaluating the broader automation pattern, the same principles also appear in How to Generate 1,000 Videos Automatically with an API and How to Create Product Videos from a CSV or Product Feed.

A JSON-to-video workflow turns structured inputs into repeatable renders.
Here is the public API shape most teams start with:
curl -X GET https://api.zvid.io/api/user/profile \
  -H "x-api-key: YOUR_API_KEY"

curl -X POST https://api.zvid.io/api/render/api-key \
  -H "Content-Type: application/json" \
  -H "x-api-key: YOUR_API_KEY" \
  -d @render-job.json

curl -X GET https://api.zvid.io/api/jobs/$JOB_ID \
  -H "x-api-key: YOUR_API_KEY"
That request pattern matters more than any single example video. Once your application can generate valid payloads, submit jobs, and track results, the same system can power demos, onboarding videos, product videos, internal ops videos, ecommerce clips, or high-volume personalized output.
What a JSON to video API actually does
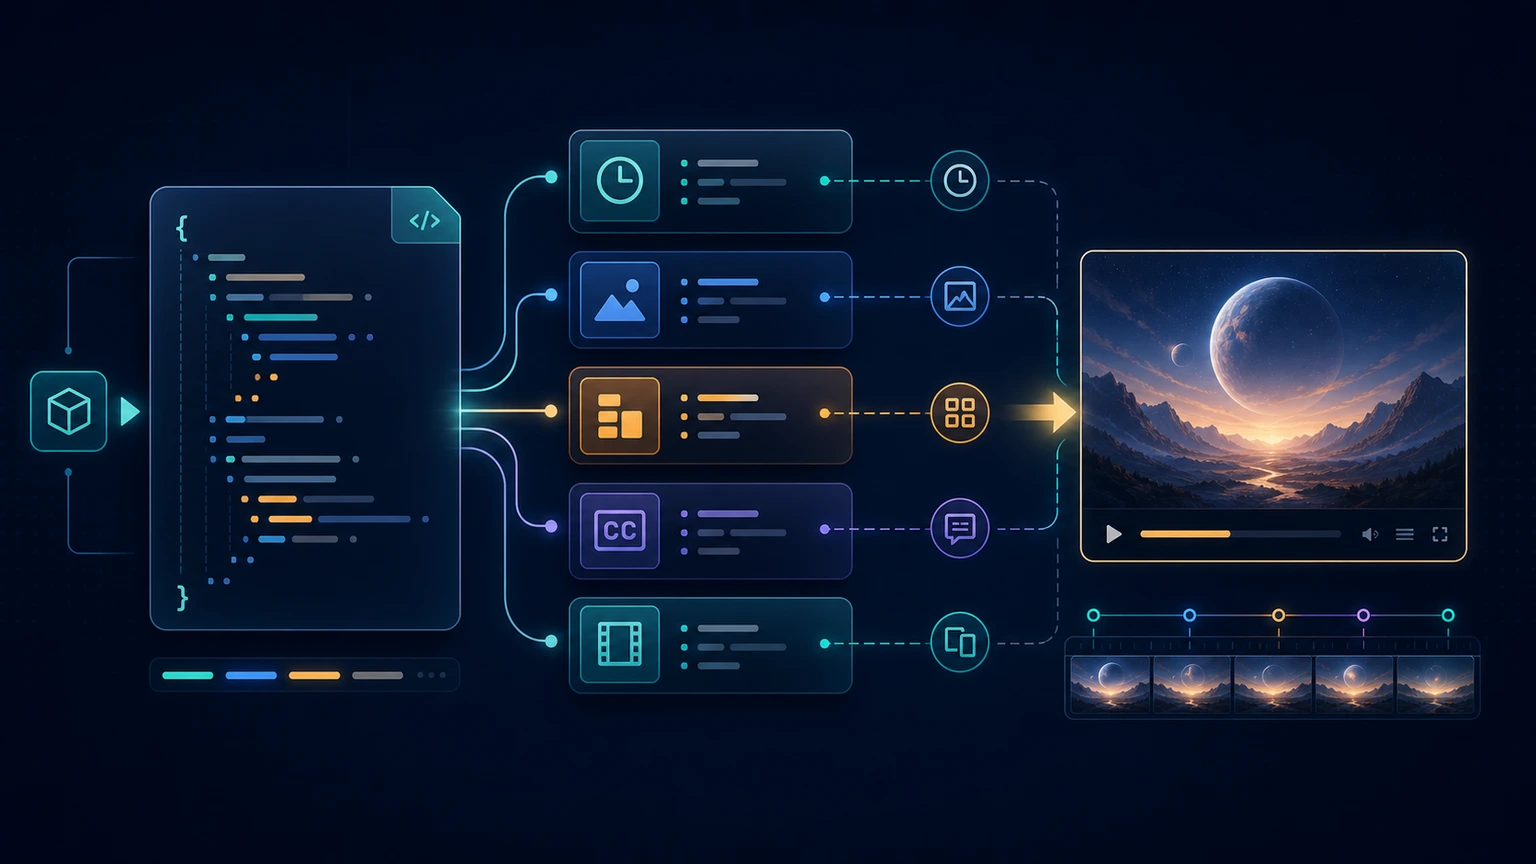
A JSON to video API separates video intent from video rendering.
Instead of storing a timeline only inside an editor, you send a structured description of the scene: canvas size, duration, background, visual layers, audio tracks, subtitle or caption timing, animation timing, and output format. The API validates that structure, queues the job, resolves any remote assets, renders the final composition, and returns a status object until the video is ready.
That is why JSON-driven video is attractive for engineering teams:
- It is versionable and diffable like the rest of your application logic.
- It makes video templates reusable across many content variations.
- It fits cleanly into backend jobs, queues, and webhook or polling workflows.
- It removes manual export steps when the creative structure is mostly stable.
If you only need one bespoke launch video, a traditional editing tool may still be faster. If you need the same video system to react to changing data, JSON starts to win.
How to convert JSON to video
At a high level, the lifecycle is: build the JSON payload, submit the render job, poll status, then store or publish the result URL. That is the practical answer to "how do I convert JSON to video?": the JSON file or JSON object becomes the source for layout, timing, media, text, and output settings.

A reliable render flow keeps payload generation, submission, and polling separate.
In practice, the flow is:
- Generate or retrieve the structured content your video needs.
- Map that content into one Zvid
payloadobject. - Send the payload to
POST https://api.zvid.io/api/render/api-key. - Save the returned
jobId,status, and any queue metadata. - Poll
GET https://api.zvid.io/api/jobs/{id}untilstateiscompletedorfailed. - Use
result.urlwhen the render completes.
You can start with a static payload checked into your repo, then move to dynamically generated JSON once the first render works. For example, an ecommerce app might inject product names, prices, image URLs, and destination format into the same template. A localization workflow might keep the layout fixed while changing headline copy, subtitle language, and voiceover files.
The Submit render job and Get render job status references are the key docs to keep open while you wire this up. If you want to make the workflow safer in production, the Get credit balance and Get user profile references are also useful checks before you submit large batches.
This is the first useful CTA for most readers: do not start with a huge pipeline. Start with one payload, one render job, and one completed output. Once that loop is stable, scaling is mostly an orchestration problem.
The anatomy of a Zvid payload
Zvid's public docs define the render body as an object with a required payload. Inside that payload, the main fields are name, resolution, duration, frameRate, outputFormat, backgroundColor, visuals, audios, and subtitle. Those JSON objects give you control over every aspect that matters in a template-driven render: element types, coordinates, media URLs, timing, and platform-ready output. The JSON Structure overview, ResolutionPreset reference, and Text Elements reference are the most important references for understanding that shape.
Below is a proof-friendly Zvid API payload that renders a short landscape explainer card. It uses SVG and TEXT elements only so the structure is easy to inspect and adapt.
{
  "name": "json-to-video-api-guide-demo",
  "resolution": "hd",
  "duration": 9,
  "frameRate": 30,
  "outputFormat": "mp4",
  "backgroundColor": "#08111f",
  "visuals": [
    {
      "type": "SVG",
      "width": 1280,
      "height": 720,
      "svg": "<svg width='1280' height='720' viewBox='0 0 1280 720' xmlns='http://www.w3.org/2000/svg'><defs><linearGradient id='bg' x1='0' y1='0' x2='1' y2='1'><stop offset='0' stop-color='#08111f'/><stop offset='1' stop-color='#1c2448'/></linearGradient><radialGradient id='glowA' cx='0' cy='0' r='1' gradientUnits='userSpaceOnUse' gradientTransform='translate(1040 120) rotate(90) scale(260)'><stop stop-color='#2fd4c5' stop-opacity='0.22'/><stop offset='1' stop-color='#2fd4c5' stop-opacity='0'/></radialGradient><radialGradient id='glowB' cx='0' cy='0' r='1' gradientUnits='userSpaceOnUse' gradientTransform='translate(220 640) rotate(90) scale(280)'><stop stop-color='#f4b647' stop-opacity='0.18'/><stop offset='1' stop-color='#f4b647' stop-opacity='0'/></radialGradient></defs><rect width='1280' height='720' fill='url(#bg)'/><circle cx='1040' cy='120' r='260' fill='url(#glowA)'/><circle cx='220' cy='640' r='280' fill='url(#glowB)'/><rect x='36' y='36' width='1208' height='648' rx='32' fill='rgba(255,255,255,0.035)' stroke='rgba(255,255,255,0.08)'/></svg>"
    },
    {
      "type": "SVG",
      "x": 258,
      "y": 360,
      "width": 372,
      "height": 454,
      "anchor": "center-center",
      "track": 2,
      "enterBegin": 0.2,
      "enterEnd": 0.9,
      "enterAnimation": "smoothleft",
      "exitBegin": 8.1,
      "exitEnd": 8.7,
      "exitAnimation": "fade",
      "svg": "<svg width='372' height='454' viewBox='0 0 372 454' xmlns='http://www.w3.org/2000/svg'><defs><linearGradient id='card' x1='0' y1='0' x2='1' y2='1'><stop offset='0' stop-color='rgba(255,255,255,0.14)'/><stop offset='1' stop-color='rgba(255,255,255,0.05)'/></linearGradient><linearGradient id='panel' x1='0' y1='0' x2='1' y2='1'><stop offset='0' stop-color='#2fd4c5'/><stop offset='1' stop-color='#4f78ff'/></linearGradient></defs><rect x='0.5' y='0.5' width='371' height='453' rx='30' fill='url(#card)' stroke='rgba(255,255,255,0.14)'/><rect x='28' y='30' width='124' height='30' rx='15' fill='rgba(47,212,197,0.14)' stroke='rgba(47,212,197,0.30)'/><text x='90' y='49' text-anchor='middle' fill='#9cf5eb' font-size='14' font-family='Inter' font-weight='700'>API READY</text><rect x='28' y='90' width='316' height='124' rx='20' fill='rgba(8,17,31,0.56)' stroke='rgba(255,255,255,0.08)'/><rect x='28' y='234' width='316' height='78' rx='20' fill='rgba(8,17,31,0.56)' stroke='rgba(255,255,255,0.08)'/><rect x='28' y='330' width='316' height='92' rx='20' fill='url(#panel)' opacity='0.92'/><rect x='54' y='116' width='132' height='16' rx='8' fill='rgba(255,255,255,0.22)'/><rect x='54' y='148' width='222' height='14' rx='7' fill='rgba(255,255,255,0.10)'/><rect x='54' y='176' width='176' height='14' rx='7' fill='rgba(255,255,255,0.10)'/><rect x='54' y='260' width='116' height='14' rx='7' fill='rgba(255,255,255,0.22)'/><rect x='54' y='284' width='218' height='12' rx='6' fill='rgba(255,255,255,0.10)'/><rect x='54' y='358' width='180' height='18' rx='9' fill='rgba(255,255,255,0.26)'/><rect x='54' y='388' width='122' height='12' rx='6' fill='rgba(255,255,255,0.18)'/></svg>"
    },
    {
      "type": "TEXT",
      "x": 850,
      "y": 142,
      "width": 520,
      "anchor": "center-center",
      "track": 6,
      "enterBegin": 0.5,
      "enterEnd": 1.1,
      "enterAnimation": "fade",
      "exitBegin": 8,
      "exitEnd": 8.6,
      "exitAnimation": "fade",
      "html": "<div style='text-align:left; color:#9cf5eb; font-size:18px; font-weight:700; letter-spacing:1px;'>STRUCTURED VIDEO WORKFLOW</div>"
    },
    {
      "type": "TEXT",
      "x": 850,
      "y": 258,
      "width": 520,
      "anchor": "center-center",
      "track": 8,
      "enterBegin": 0.7,
      "enterEnd": 1.4,
      "enterAnimation": "fade",
      "exitBegin": 7.9,
      "exitEnd": 8.5,
      "exitAnimation": "fade",
      "html": "<div style='text-align:left; color:#ffffff; font-family:Poppins; font-size:46px; font-weight:700; line-height:1.12;'>Send JSON. Track jobs. Render videos at scale.</div>"
    },
    {
      "type": "TEXT",
      "x": 850,
      "y": 426,
      "width": 520,
      "anchor": "center-center",
      "track": 8,
      "enterBegin": 1,
      "enterEnd": 1.6,
      "enterAnimation": "fade",
      "exitBegin": 7.8,
      "exitEnd": 8.4,
      "exitAnimation": "fade",
      "html": "<div style='text-align:left; color:#d7def6; font-size:22px; line-height:1.45;'>Define layout, timing, media, and output in JSON, then let the API queue and render the final video.</div>"
    },
    {
      "type": "TEXT",
      "x": 850,
      "y": 556,
      "width": 360,
      "anchor": "center-center",
      "track": 9,
      "enterBegin": 1.2,
      "enterEnd": 1.8,
      "enterAnimation": "fade",
      "exitBegin": 7.7,
      "exitEnd": 8.3,
      "exitAnimation": "fade",
      "html": "<div style='display:inline-block; background:rgba(244,182,71,0.20); border:1px solid rgba(244,182,71,0.42); border-radius:24px; padding:16px 24px; color:#ffffff; font-size:22px; font-weight:700;'>Start with one render job</div>"
    },
    {
      "type": "TEXT",
      "x": 640,
      "y": 654,
      "width": 1080,
      "anchor": "center-center",
      "track": 4,
      "enterBegin": 1.4,
      "enterEnd": 2,
      "enterAnimation": "fade",
      "exitBegin": 7.6,
      "exitEnd": 8.2,
      "exitAnimation": "fade",
      "html": "<div style='text-align:center; color:#c3cceb; font-size:16px;'>A small payload example is enough to prove the render loop before you scale it.</div>"
    }
  ]
}
A payload stays useful when each field has a stable responsibility in the render.
The point of this example is not the design itself. The point is the shape: one object describes the video in a way your backend can generate repeatedly.
For image-heavy workflows, the Image Elements reference explains remote image handling, while the Text Elements reference covers the safe text and HTML options most teams use for headlines, labels, and CTAs.
A practical API request flow
Once you understand the payload, the rest of the system is normal API engineering.
Start by verifying auth:
curl -X GET https://api.zvid.io/api/user/profile \
  -H "x-api-key: YOUR_API_KEY"
Then check credits:
curl -X GET https://api.zvid.io/api/credits/balance \
  -H "x-api-key: YOUR_API_KEY"
Then submit a render request:
{
  "payload": {
    "name": "json-to-video-api-guide-demo",
    "resolution": "hd",
    "duration": 9,
    "frameRate": 30,
    "outputFormat": "mp4",
    "backgroundColor": "#08111f",
    "visuals": [
      {
        "type": "TEXT",
        "text": "Hello from Zvid",
        "x": 640,
        "y": 360,
        "anchor": "center-center",
        "style": {
          "fontSize": 54,
          "color": "#ffffff",
          "textAlign": "center"
        }
      }
    ]
  }
}
Poll until the job finishes:
curl -X GET https://api.zvid.io/api/jobs/$JOB_ID \
  -H "x-api-key: YOUR_API_KEY"
The Getting Started guide shows the same sequence with example responses. In production, the important discipline is to store the returned jobId, track status transitions, and only treat the video as complete when the jobs endpoint returns a finished result.
This is where the middle CTA makes sense: if you are still evaluating vendors or architecture, do not optimize for every edge case up front. Send one render, inspect the output, and confirm the API model fits how your product already stores data.
Video templates, animation, and dynamic output
A JSON to video workflow works best when the template is treated as a system contract. The JSON can hold fixed design rules, dynamic fields, or both. Fixed rules might include frame rate, resolution, brand colors, text styles, and animation timing. Dynamic fields might include headline text, image URLs, subtitle files, product details, prices, CTAs, and output format.
This is different from asking an AI video generator to interpret a loose text prompt. With structured JSON, the application can programmatically generate hundreds of videos while keeping the same layout and brand rules. You can still use AI-generated copy, images, or voiceovers upstream, but the render payload should stay explicit enough that the final video is predictable.
For a scalable pipeline, keep three layers separate:
- Content data: the product, campaign, customer, or locale fields.
- Template rules: the scene layout, text animation, element types, and fallback behavior.
- Render orchestration: the API call, queue handling, retries, and final video URL storage.
Manual video tools vs JSON-driven rendering
Most teams should not think of JSON rendering as a replacement for all creative tools. It is a replacement for repeated manual export work when the video structure is stable.
- Manual editors are better when every video needs hands-on creative changes.
- A JSON to video API is better when the same structure repeats across many variants.
- Manual editors optimize for one timeline at a time.
- JSON-driven rendering optimizes for systems that can generate many timelines safely.
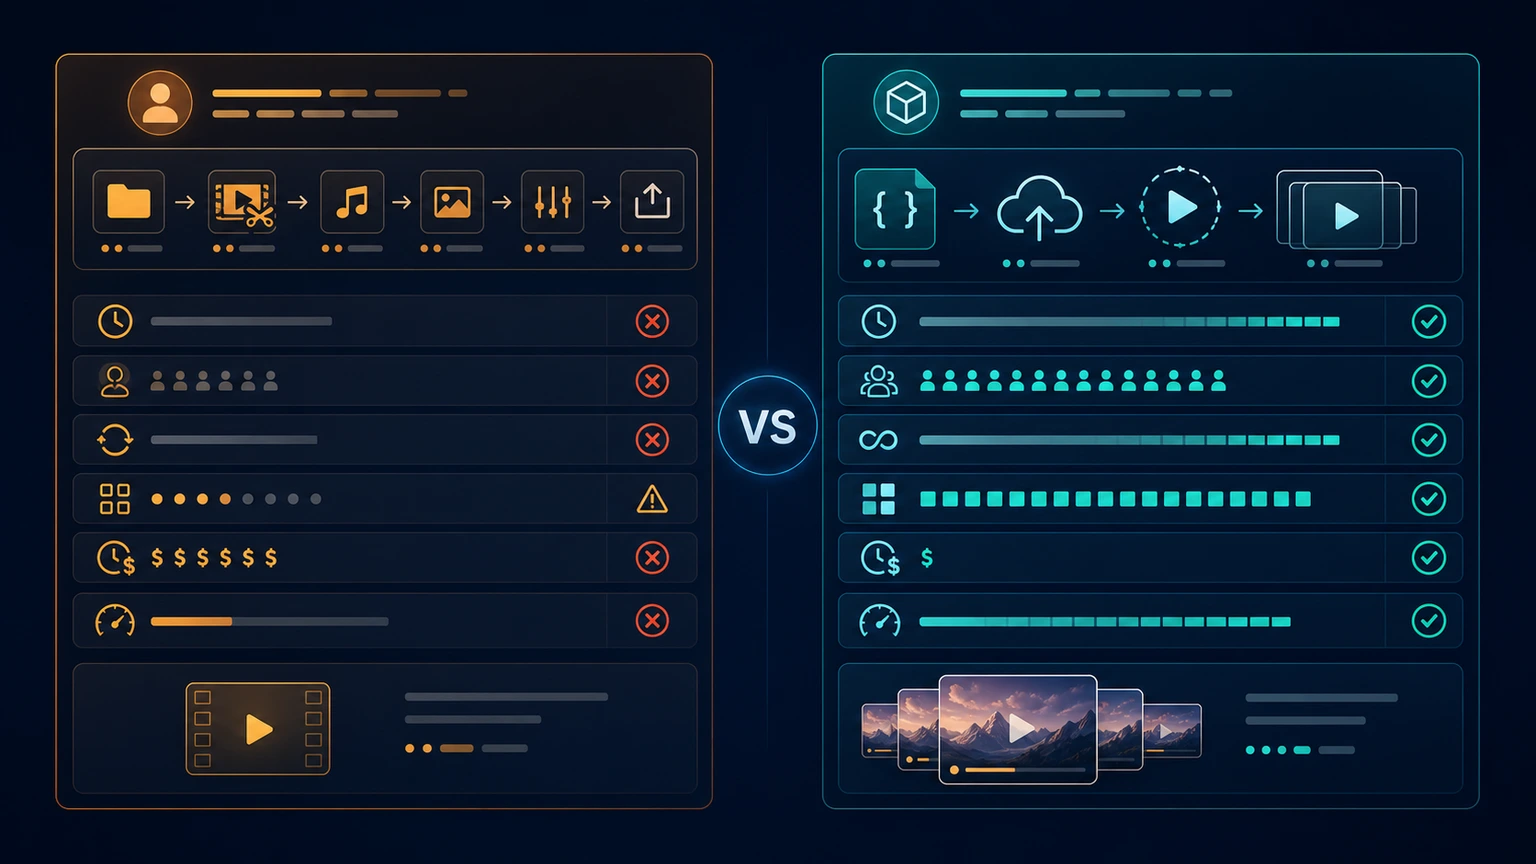
JSON rendering is strongest when the structure repeats and the inputs change.
If your use case is catalog automation, localization, campaign fan-out, onboarding videos, or personalized clips, the same template logic can keep paying off. That is why high-volume and feed-driven use cases often move toward structured rendering instead of more manual editing.
No-code integrations and JSON2Video alternatives
Some teams call a JSON to video API directly from a backend service. Others connect the same video automation workflow through no-code or low-code tools such as n8n, Zapier, Make, Shopify exports, CRM triggers, or scheduled spreadsheet jobs. The integration pattern is the same: collect structured data, generate the JSON payload, send the render request, and route the completed video file to the next system.
You will also see tools and category terms such as JSON2Video, video editing API, dynamic video, and programmatic video creation API in this market. The useful comparison is not only feature count. Ask whether the platform gives you enough control over templates, output formats, media handling, watermarks, API key authentication, job status, and repeatable rendering without manual editing.
For Zvid, the fit is structured video rendering through a hosted API. It is not positioned here as a prompt-only text-to-video model such as Sora, Veo, or Seedance, and it is not a hosting-only video API. It is for teams that want application data to become on-brand videos through explicit JSON payloads.
Common mistakes
The most common mistake is treating the JSON payload as a one-off export artifact instead of a reusable system contract.
Other mistakes show up repeatedly:
- Mixing business data cleanup with scene layout logic in the same step
- Hard-coding visual values that should come from reusable template rules
- Skipping credit or auth checks before large submissions
- Ignoring job-state tracking and assuming a successful submit means a finished render
- Designing templates that only work for one headline length, one locale, or one media shape
- Treating every provider as interchangeable without checking template control, integration needs, or output requirements
Another common failure is overfitting the first demo. A payload can look fine with one short headline and then break once real inputs are longer, translated, or missing optional media. That is why repeatability matters more than getting one perfect screenshot.
When to use Zvid
Use Zvid when you want a hosted API that turns structured video definitions into repeatable render jobs without building your own rendering pipeline.
Zvid is a strong fit when you need:
- Programmatic video generation from structured app data
- One template system reused across many outputs
- Public API endpoints for auth checks, render submission, and job polling
- Support for timed text, SVG, images, videos, audio, and subtitle-driven workflows
- A scalable way to generate videos from JSON without manual editing for each variation

One structured video system can support many teams once the render loop is stable.
If you only need occasional handcrafted exports, the API model may be unnecessary. If you already have structured content and want the output video to be just another system-generated asset, it becomes much more useful.
The right next step is simple: build one small payload, render one finished video, and then decide whether your workflow needs more templates, more variations, or more orchestration around the same API core.
FAQs
Is a JSON to video API only for high-volume rendering?
No. High volume is one use case, but the same model is useful even for smaller systems when you want predictable, repeatable output from structured content.
How do I convert JSON to video?
Create a JSON payload that describes the video, send it to a render endpoint, save the returned job ID, and poll the job until the API returns a completed video URL. In Zvid, that means sending a payload to the render endpoint and tracking the job status.
Do I need to generate every field dynamically?
Not at all. Most teams keep a mostly fixed template and only inject the fields that change, such as title, subtitle, CTA, product image, locale, or destination format.
Can I render multiple videos from different JSON inputs?
Yes. Use the same template rules, generate one JSON object per variation, and submit one render job for each output. That is how teams generate videos automatically for product catalogs, localized campaigns, onboarding flows, and personalized clips.
Can I start with text and simple graphics before I add remote media?
Yes. That is often the safest way to prove the payload model first. Then you can expand into remote images, video clips, audio, or subtitles as the use case gets more complex.
Can I connect a JSON to video workflow to n8n, Zapier, or Shopify?
Yes, as long as the integration can prepare structured data and make authenticated API requests. Many teams use no-code tools for triggers and routing, while keeping template logic and render validation in application code.
What should I save from each render request?
Save the payload version, the returned jobId, the current job state, and the final output URL once the job completes. That gives you enough information to debug, retry, or regenerate later.
If your product already thinks in structured inputs, a JSON to video API is usually the cleanest path to repeatable rendering. Start with one Zvid payload, one render job, and one completed output, then expand only after that loop feels reliable.
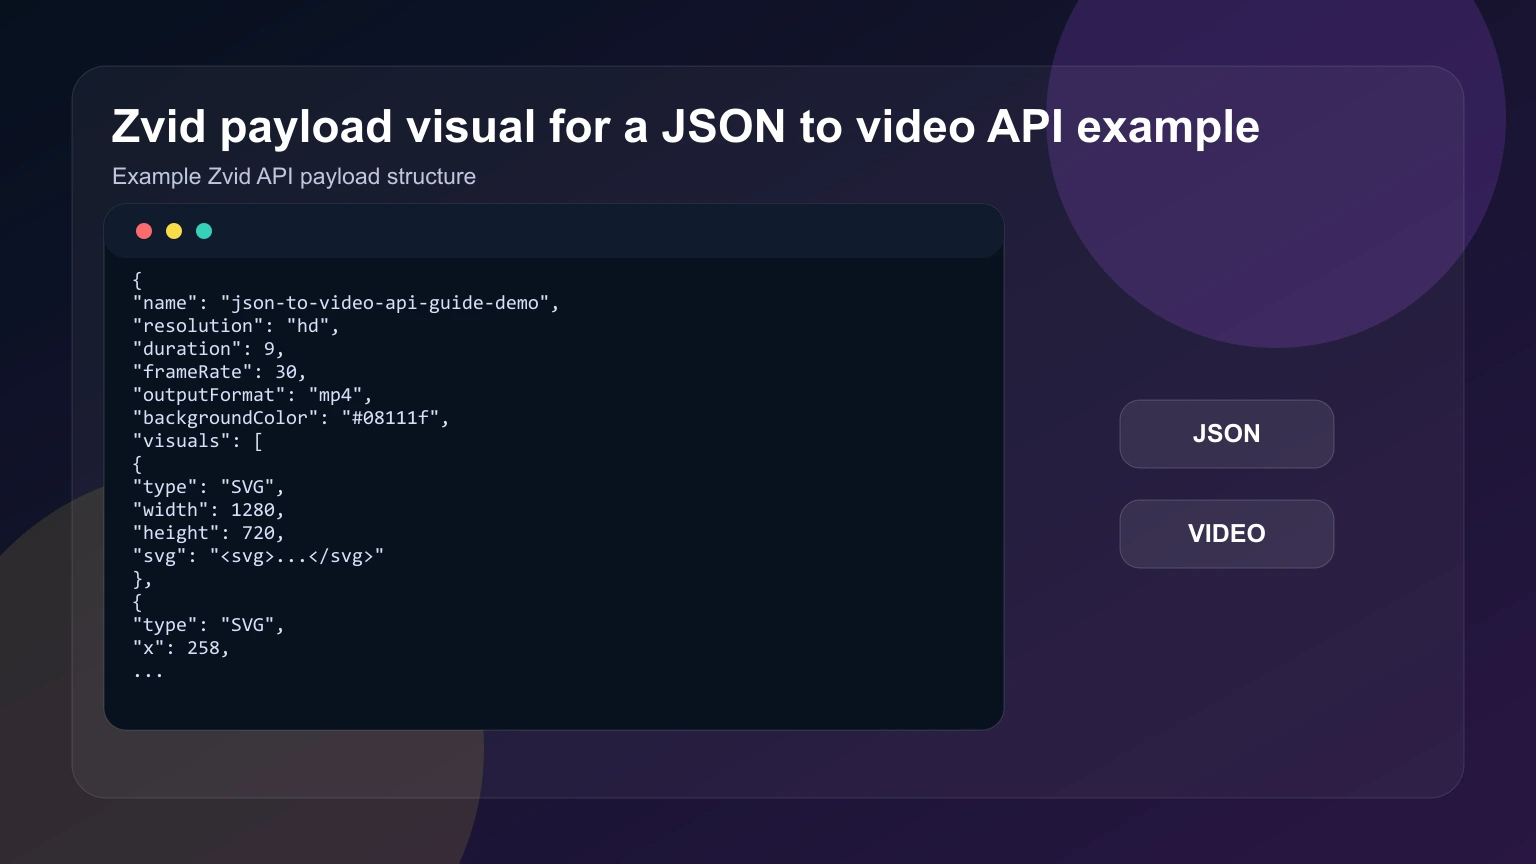
The payload visual is generated from the article's real render example.