Developer Tutorials
Generate Video from JSON with the Editor and Node.js
Generate a video from JSON in the Zvid visual editor. Import, preview and download your MP4, then export the project and automate rendering with Node.js.
 By Mina RamzyPublished Updated
To generate video from JSON with Zvid, start by importing a project into the visual editor. Preview its scenes, adjust the text, and render a downloadable MP4. Then export the same composition as JSON and use the Node.js example to automate future renders.
You can go from JSON to video in the editor without writing code or creating an API key. You need a browser and a Zvid account with enough credits to render. Node.js and an API key are needed only for the coding section. The supplied example uses text only, so there is no stock footage or other media to prepare.
The video you will make
The first scene reads “JSON in.” for three seconds. The second reads “Video out.” for three seconds. The result is a silent, 1280 × 720 MP4 at 30 frames per second.
1. Open the JSON in the visual editor
Download the sample project JSON, then open editor.zvid.io. If the JSON opens as text in your browser, save that page as project.json.
- If another composition is open, keep a copy with Export → Download JSON before importing. Import replaces the working document.
- Click Import in the upper toolbar, then Open .json file and select
project.json. Selecting the file imports it immediately. If you paste the JSON instead, click Import project afterward. - Check that the project name is first-json-video, the resolution is hd · 1280×720, the frame rate is 30, and the output format is mp4.
- Click Scenes in the left tool rail. You should find two scenes: json-in and video-out. Select json-in to see its text on the canvas.
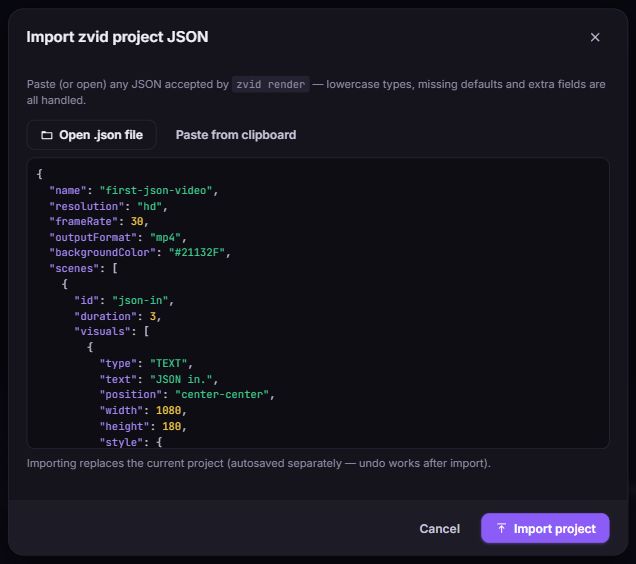
Import the project JSON, which describes the composition. The separate request JSON download later in this guide wraps that project for the API; you do not need that wrapper in the editor.
On a narrow screen, open the three-dot More editor actions menu to find Import. The tools, including Scenes, run along the bottom. The project import guide explains these controls and how to keep a copy of existing work.
2. Preview and adjust the two scenes
Click each scene card in Scenes to inspect its content. Each scene has a fixed length of three seconds, so the two scenes make a six-second video.
| Scene | Text | Duration | Text color |
|---|---|---|---|
| json-in | JSON in. | 3 seconds | Cream |
| video-out | Video out. | 3 seconds | Yellow |
To change a message, select its scene and click the text on the canvas. In Design → Content, choose Plain text and edit the wording. Use Design → Typography to change its size, weight or color, and Layout to position the text box. Keep the supplied wording and settings for now if you want the exact sample shown above. See editing text for optional help.
To inspect the timing, select a scene and open Scene settings. With Duration → Auto off, Set length should be 3. Keep the first scene's Transition to next scene at None (hard cut). A transition can overlap scenes and change the total duration. The scene guide explains those controls.
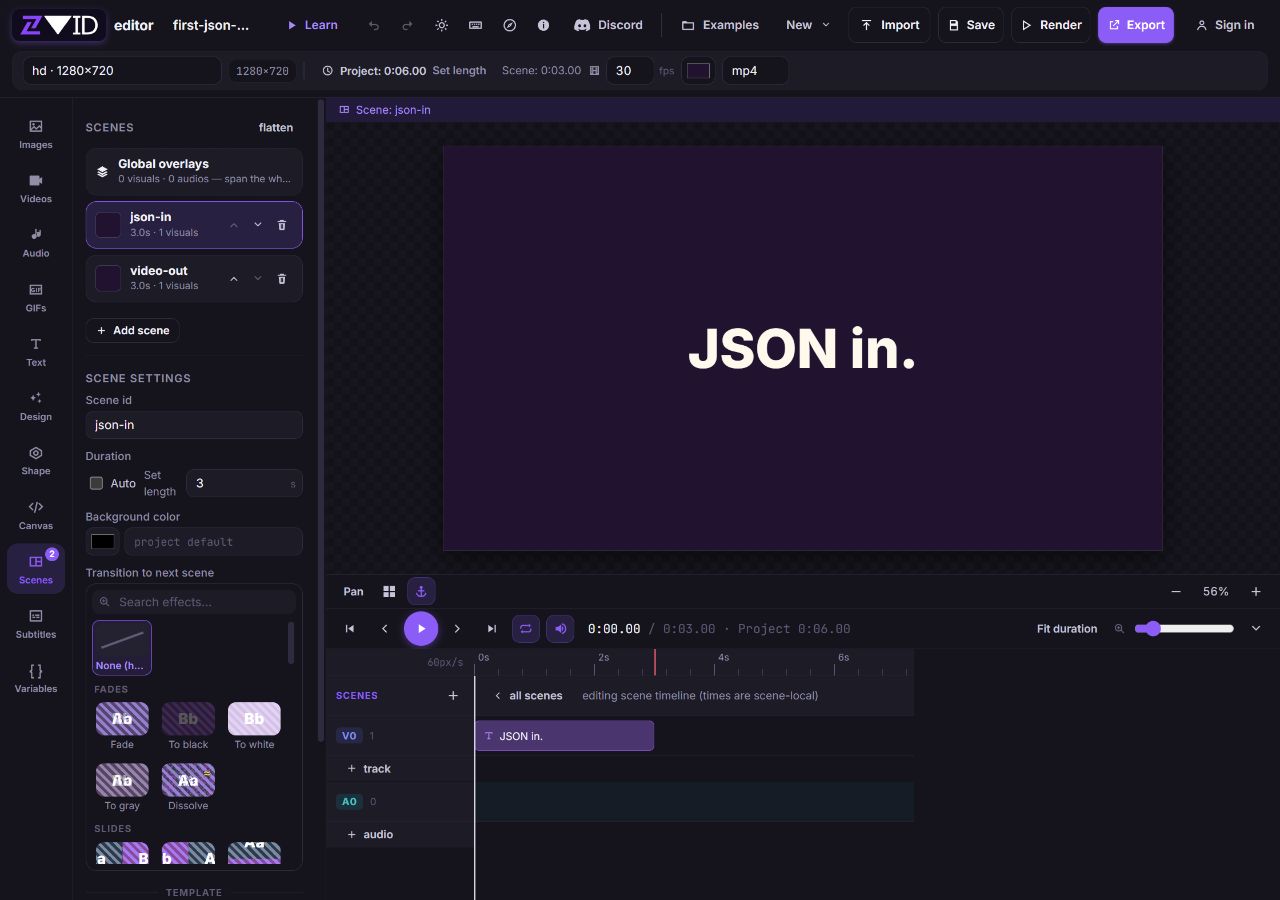
Preview the complete sequence:
- In Scenes, select Global overlays.
- Above the timeline, select full movie, beside Fit duration.
- Move the playhead to the beginning and click Play, or press Space outside a text field.
- Watch all six seconds. “JSON in.” should appear first, followed by “Video out.” Both messages should fit inside the frame, with no blank interval. This example has no audio.
The full movie view is read-only. Select a scene card again to edit that scene. Browser playback helps you review the composition and does not consume render credits; it does not create a downloadable MP4. More detail is in previewing all scenes.
3. Render and download the video in the editor
Budget 6 render credits for the unchanged sample. Importing, editing, local preview and JSON export do not consume render credits. Starting a cloud render spends credits.
- Click Export → Validation and resolve any listed errors. Review warnings as well, then close the dialog. This is a local check, so it does not confirm your account's hosted limits or current render cost.
- Click Render in the top toolbar. If prompted, choose Sign in to render and sign in with your Zvid account.
- Check the output summary and available balance. The dialog shows your balance before submission; it does not show an account-aware cost estimate before Start render. If you changed the sample or need a current quote, export its JSON and run the validation step in the coding section before submitting.
- When ready to spend the credits, click Start render. Wait through Queued and Rendering in the cloud until the completed video appears.
- Play the finished result, then click Download to save the MP4. Check both scenes in the downloaded file and keep a local copy before the hosted output expires.
If you close the dialog while the job is running, check your videos in the dashboard. Closing the dialog does not cancel the job. Do not start another render just because the progress window disappeared. For a failed job, read its error before trying again. The render and download guide covers these states.
4. Export the project for coding
Click Export, choose project.json, then click Download JSON. With the supplied project name, the file is named first-json-video.json. It contains the editable composition, not the rendered MP4. You now have both the video and the JSON that describes it.
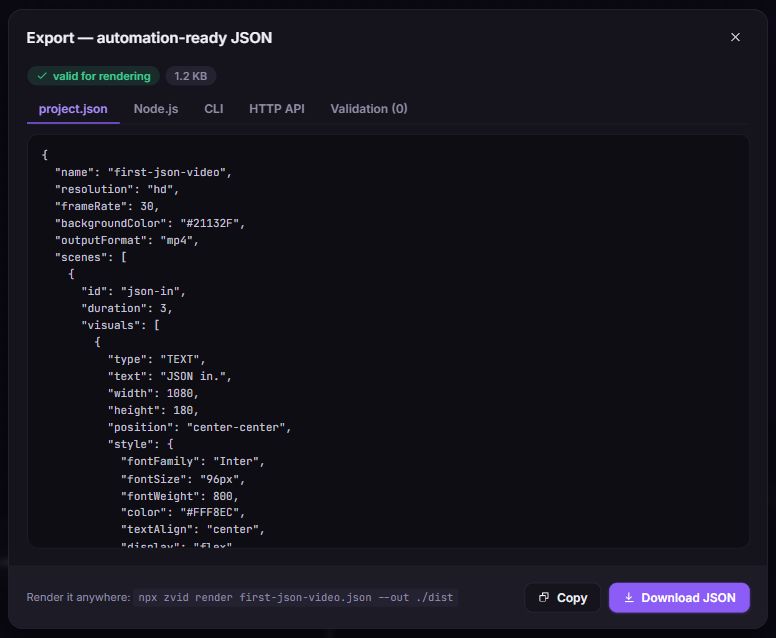
Use Save separately if you want an editable cloud draft: sign in, enter a project name if prompted, and click Save project. If your account has reached its saved-project limit, keep the downloaded JSON as your portable copy. Saving a cloud draft is not required to export JSON.
You can stop here if you only need the video. Continue below when you want your application to render this design. The editor's Node.js, CLI and HTTP API tabs provide starting snippets; the downloadable example below also includes credit checks, job tracking, download and recovery. See JSON and code export.
Rendering again from code creates another job and spends credits again. If you already rendered in the editor, you can install the example and run validation without submitting a second render.
5. Set up the Node.js example and API key
You need Node.js 22.9 or newer, npm, an internet connection and a Zvid account with an API key. Run this on your computer or server so your key can stay private.
Create the key at app.zvid.io/api-keys: sign in, open API Keys, click Create API Key, give it a name, and copy the key when it appears. Zvid shows the full key only once. See API key authentication for optional background.
Budget 6 render credits for this sample. Validation does not consume render credits. Rendering is a separate action that spends credits. Keep enough balance available, check the current estimate, and resolve any account-limit error before submitting.
Extract the ZIP and open a terminal inside its generate-video-from-json folder, where package.json is located. Install the pinned official @zvid/sdk dependency:
node --version
npm ci
If PowerShell blocks npm.ps1, replace npm with npm.cmd in these commands. You do not need to change your execution policy.
Copy .env.example to .env in the same folder. In PowerShell, run Copy-Item .env.example .env. On macOS or Linux, run cp .env.example .env. Open .env, paste your key after ZVID_API_KEY=, and keep the limit at 6:
ZVID_API_KEY=
MAX_RENDER_CREDITS=6
The commands load this file automatically. Existing process environment variables take precedence. Keep .env private: do not put the key in project JSON, browser code or a public repository.
The example already includes the same sample project at data/project.json. To automate your edited version, replace that file with the JSON you downloaded from the editor, naming it project.json. Keep the project itself at the top level; the script adds the API's payload wrapper. Changes to the design or duration can change the estimate.
6. Validate the JSON before rendering
Run the check first:
npm start
It calls POST https://api.zvid.io/api/render/validate/api-key, sending your key in the x-api-key header. For the unchanged example, expect:
Valid: true. Estimated credits: 6.
No render submitted. Run npm run render when ready.
Open out/validation.json to inspect valid, creditsRequired, warnings and the resolved payload. “Resolved” means Zvid has applied defaults and calculated settings such as the canvas dimensions. The current response is authoritative if the estimate changes.
The script stops if validation fails, returns warnings, or estimates more than MAX_RENDER_CREDITS. Correct the issue before continuing. The ceiling is a check in this example, not a server-side billing cap. Validation does not reserve credits or guarantee that a later render will succeed. The validation and estimate guide explains the response in more detail.
7. Render, wait and save the MP4 from code
When the estimate is acceptable, run:
npm run render
This validates again, records the submission attempt, sends one render request, and saves the returned jobId. It then checks the job every two seconds for up to ten minutes. Each network request also has a timeout.
Wait for state: "completed". An accepted request means the job was submitted. Progress can reach 100% while the job is still active; that is not yet a finished video.
On completion, the script downloads out/first-json-video.mp4. Open it in a video player and watch the full clip. Check that “JSON in.” appears first, “Video out.” appears second, and both messages fit inside the frame. The absence of sound is intentional.
These are the essential calls in the supplied implementation; all helpers are included:
const request = buildRequest(await readJson('data/project.json'));
const quote = await zvid.authoring.validate(request);
checkQuote(quote, Number(process.env.MAX_RENDER_CREDITS || 6));
const accepted = await zvid.renders.create(request);
const job = await trackJob(zvid, accepted.jobId);
await downloadVideo(outputUrl(job), 'out/first-json-video.mp4');
The complete file also saves the attempt and job before tracking. It disables automatic submission retries. The API key is sent only to https://api.zvid.io, never with the media download.
| Operation | API endpoint | What you keep |
|---|---|---|
| Validate | POST /api/render/validate/api-key |
Estimate and resolved project |
| Submit | POST /api/render/api-key |
jobId and reserved credits |
| Track | GET /api/jobs/{jobId} |
state, result or failedReason |
A completed job's result may be a URL string or an object containing url; the helper handles both and checks output expiry before downloading. Keep the local MP4 if you need it beyond the hosted output's retention period. See job states and output retrieval.
From JSON to video: project, request and job
These objects serve different purposes. Keeping them separate prevents a common first-request error.
| Object | Purpose | In this example |
|---|---|---|
| Project | Describes what appears and when | data/project.json |
| Request | Wraps the project under payload |
The script builds it; data/request.json is a reference for the supplied sample |
| Job | Records progress and the result | out/run.json saves the ID; out/job.json saves the latest status |
The wrapper is simply const request = { payload: project }. Do not put scenes beside payload, and do not add a second payload inside the project. The JSON structure reference explains the full contract.
Here is the complete project. You can also download the project JSON or complete request JSON. You do not need to copy this block to run the supplied files.
{
  "name": "first-json-video",
  "resolution": "hd",
  "frameRate": 30,
  "outputFormat": "mp4",
  "backgroundColor": "#21132F",
Collapse example
{
  "name": "first-json-video",
  "resolution": "hd",
  "frameRate": 30,
  "outputFormat": "mp4",
  "backgroundColor": "#21132F",
  "scenes": [
    {
      "id": "json-in",
      "duration": 3,
      "visuals": [
        {
          "type": "TEXT",
          "text": "JSON in.",
          "position": "center-center",
          "width": 1080,
          "height": 180,
          "style": {
            "fontFamily": "Inter",
            "fontSize": "96px",
            "fontWeight": 800,
            "color": "#FFF8EC",
            "textAlign": "center",
            "display": "flex",
            "alignItems": "center",
            "justifyContent": "center"
          }
        }
      ]
    },
    {
      "id": "video-out",
      "duration": 3,
      "visuals": [
        {
          "type": "TEXT",
          "text": "Video out.",
          "position": "center-center",
          "width": 1080,
          "height": 180,
          "style": {
            "fontFamily": "Inter",
            "fontSize": "96px",
            "fontWeight": 800,
            "color": "#F5D66F",
            "textAlign": "center",
            "display": "flex",
            "alignItems": "center",
            "justifyContent": "center"
          }
        }
      ]
    }
  ]
}
The hd preset sets the canvas to 1280 × 720. Each scene lasts three seconds and contains one TEXT element. Scenes play in array order. With no transitions, the durations add up to six seconds.
The element's width and height define its text box, not the video dimensions. position: "center-center" centers that box. Text size, weight and color belong inside style. These fixed values keep the first example easy to inspect.
Resume a job or fix an error
If tracking or downloading is interrupted after the job ID was saved, run:
npm run resume
It follows the same saved job and downloads its output when ready. It does not submit a new render. A timeout on your computer does not cancel work already running on the server.
| Problem | Next action |
|---|---|
| Missing key or HTTP 401 | Check ZVID_API_KEY in .env and run from the example folder. |
| Invalid JSON or a field error | Correct the named field in data/project.json, then run npm start. |
| Estimate exceeds 6 credits | Inspect the project and quote. Raise the limit only if you intend to spend more. |
Job reports failed |
Read failedReason in out/job.json. Correct the cause before submitting again. |
| Wait or download stops | Run npm run resume if out/run.json contains a job ID. |
| Submission stopped before saving a job ID | Check Renders at app.zvid.io first. A missing response does not prove no job was created. |
The attempt record blocks another submission from the same folder. For a deliberately new video, inspect the previous job, rename out to preserve its record, edit the project, and validate before rendering again. Run one copy at a time so its status files remain clear.
For field-by-field examples, use Debug invalid JSON in the Zvid Video API. For help with a specific job, include its ID at https://zvid.io/contact, without sharing your key.
Adapt the example after the first render
Start by changing the two text values or their colors in data/project.json. Validate again and watch the new result. Changing scene durations also changes the video's duration and may change its credit estimate.
This is structured JSON rendering: the project specifies the composition. A JSON prompt sent to a generative AI model is a different input; it does not automatically match Zvid's schema. If an AI assistant writes your project, validate its output through the same route before rendering.
When the layout stays fixed and only the content changes, template variables let you supply new values without rebuilding the design. Variables also work in an inline payload; a stored template is useful for reusing and managing the design.
Once you have a reviewed result, choose projects, templates or bulk rendering for your application. That guide covers design changes, variable compatibility and recovery of individual batch items.
Frequently asked questions
Can I generate a video from JSON in Zvid without writing code?
Yes. Download a valid Zvid project JSON file, open the visual editor, and use Import → Open .json file. Preview its scenes, then choose Render → Start render and download the completed MP4. Cloud rendering requires a signed-in account and enough credits; it does not require an API key. Export → Download JSON keeps a separate editable copy of the composition.
Can I generate a video from JSON without using the Zvid visual editor?
Yes. Zvid accepts a project directly inside a render request's payload. The Node.js example includes the project, validates it, submits the render and downloads the MP4. The visual editor is optional for this workflow.
Can I convert any JSON to video with Zvid?
No. The input must describe a valid Zvid project, or provide variables for a compatible template. A product feed or an AI prompt in JSON needs to be mapped into that structure before rendering. Valid JSON syntax alone does not describe a video.
How many render credits does this JSON video example use?
The supplied six-second example has a 6-credit render estimate. Starting a render in either the editor or Node.js spends credits; doing both creates two paid jobs. Importing, local preview, JSON export and API validation do not consume render credits. In the Node.js example, run npm start for a current quote before npm run render; the script stops when the estimate exceeds its configured limit.
Why does a Zvid render show 100% progress without a downloadable video?
Progress is a hint, while state: "completed" is the completion check. A job can still be active at 100%. Wait for completion and a usable result URL; the example also checks whether the hosted output has expired.
How do I resume a JSON video render without paying for another submission?
Run npm run resume after a job ID has been saved in out/run.json. It tracks that existing job and downloads the result. If submission stopped before saving an ID, inspect Renders in the dashboard before attempting a new render.