Tutorials
Create Shopify product promo videos with n8n
Turn one approved product into a vertical promo with n8n and Zvid. Start with Google Sheets, then explore Shopify polling or use the complete Node.js companion.
 By Mina RamzyPublished
A new product needs more than a listing. It needs a short video with the right photo, price and reason to look closer. Rebuilding that promo by hand becomes repetitive when every launch uses the same brand design.
This n8n template turns one product into a 14.3-second vertical promo. Start with a small Google Sheets queue, review the finished MP4, then connect the optional Shopify source. The Shopify branch checks for the newest created product on a schedule; it is not an instant product-created trigger or a complete catalog queue.
The main walkthrough uses n8n. The Prefer Node.js? section provides a complete companion using the same product mapper and video builder.
See what the workflow creates
The design keeps photos inside cream panels, displays a supplied price and adds a savings badge only when the compare-at price produces a valid discount. A second image supplies another angle; with one image, the design reuses it with a different movement.
In sheet mode, success means a completed video, done in the original row's Status, and its MP4 link in VideoUrl. The template does not upload to Shopify or post to social networks.
1. Get the workflow and prepare your accounts
Use the Zvid workflow page, official n8n template for this walkthrough.
Allow roughly 20–30 minutes for sheet setup when your n8n workspace and Google connection are already available. This is a planning estimate, not a render-time promise. Shopify app setup needs additional time.
You need an n8n workspace with permission to install community nodes, a Zvid API key from app.zvid.io/api-keys, and a Google account that can edit the sample spreadsheet. An owner/admin may need to install the node for you. The sample row includes usable images, so you do not need a store to try it.
The optional Shopify path needs an installed app with read_products access and a working Admin API token. It reads Shopify and requires no product-write permission.
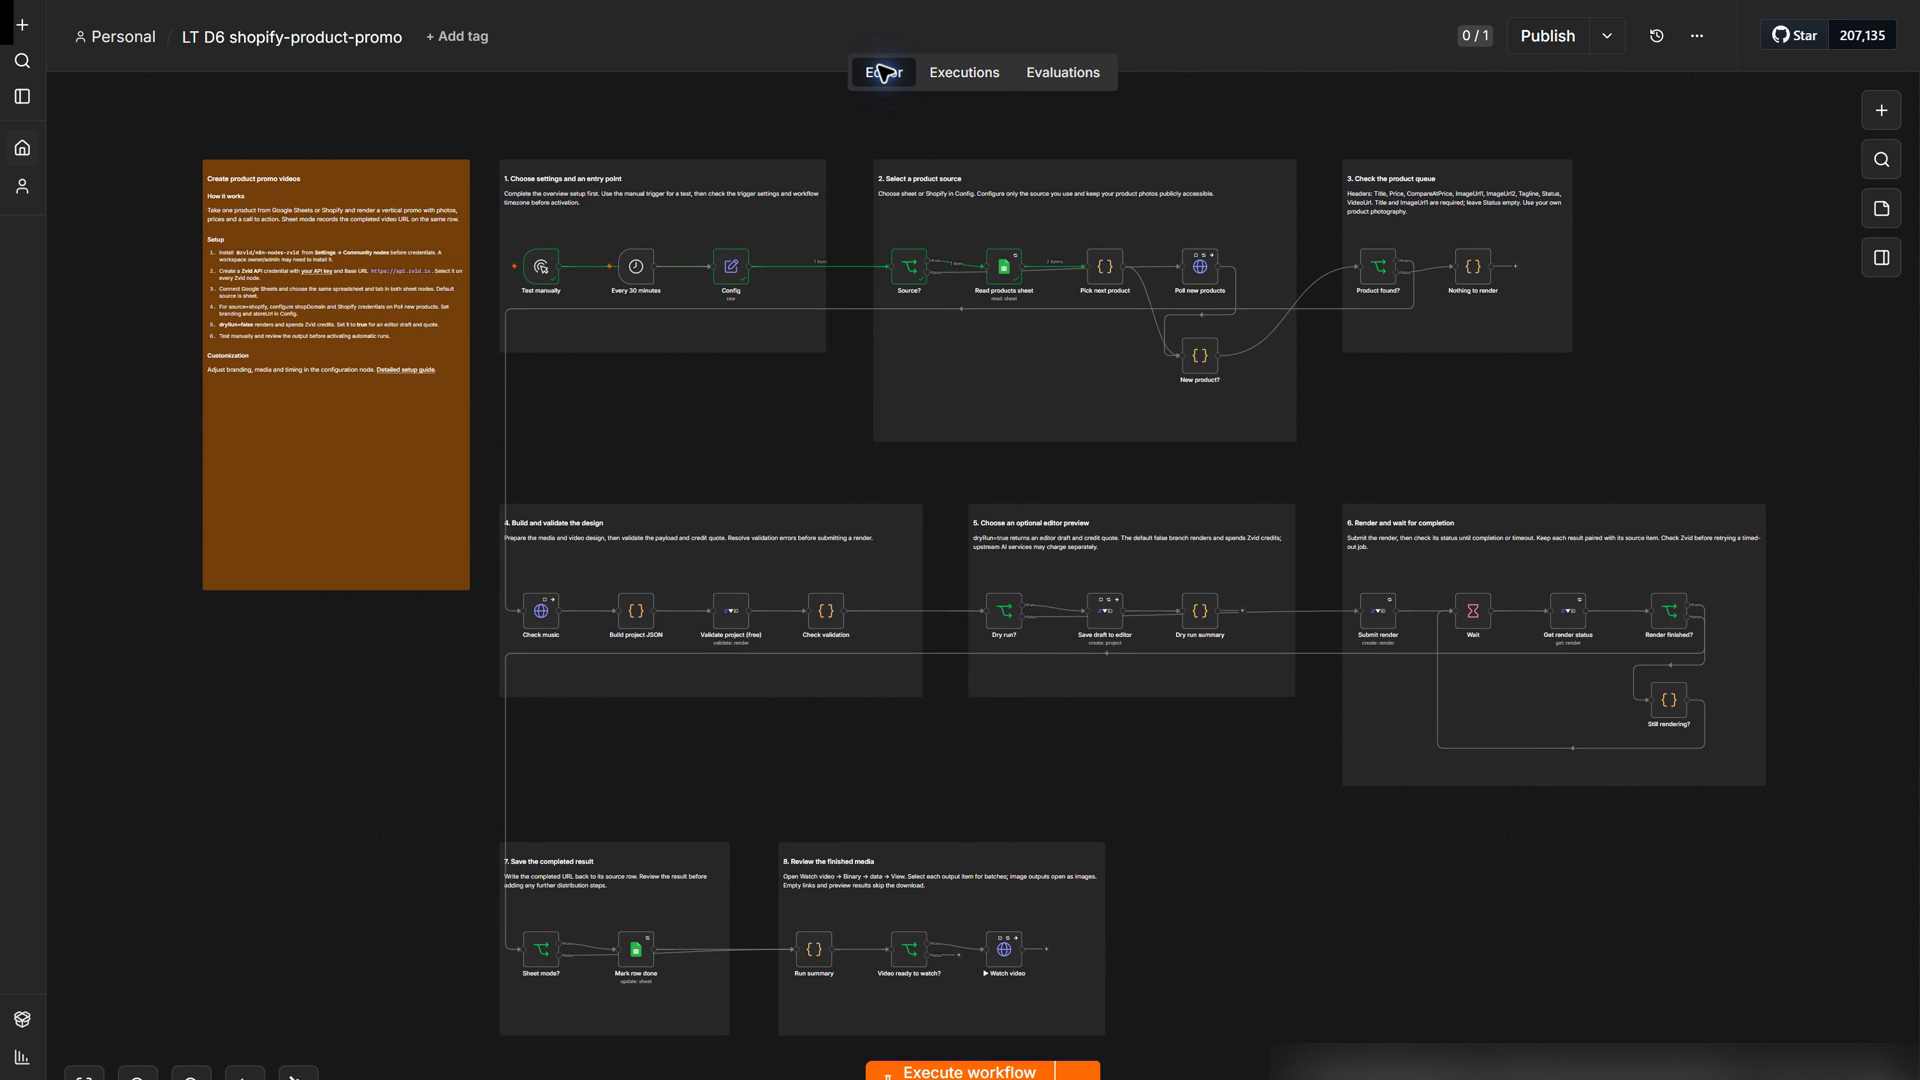
The path is select one product → build the design → validate → preview or render → save → watch. If you need to process an existing catalog and attach videos to product media, use the separate Shopify Product Video guide.
2. Install, import and connect credentials
Install Zvid and import the file
Open Settings → Community nodes → Install in n8n, enter @zvid/n8n-nodes-zvid, and finish installation. A workspace owner/admin may need to do this before credential setup.
Create a workflow, open its menu, choose Import from File, and select the downloaded JSON. Keep the schedule unpublished or inactive. Before executing the workflow, open Config and change dryRun to true.
Open Validate project (free) and create a Zvid API credential. Paste your Zvid key and use Base URL https://api.zvid.io. Select that same credential on Save draft to editor, Submit render and Get render status. Keep the key in the credential, not Config or a shared JSON file. See Zvid authentication for key management.
Connect Google Sheets
In Read products sheet, create a Google Sheets OAuth2 API credential. On n8n Cloud, choose Sign in with Google, select the account that can edit your sheet, and approve access.
For self-hosted n8n with custom OAuth, create a Google Cloud project, enable the Google Sheets and Drive APIs, and configure Google Auth Platform's consent settings. Add your account as a test user if the app is in testing. Create an OAuth client of type Web application and paste n8n's OAuth Redirect URL into its authorized redirect URIs. Enter the resulting Client ID and Client Secret in n8n, then sign in. n8n's Google credential instructions illustrate the setup.
Create a spreadsheet, import the sample CSV, and name its tab Products. In both Read products sheet and Mark row done, choose the same Google credential, spreadsheet and tab. For By ID, copy the spreadsheet URL's text between /d/ and /edit; use the tab label as the sheet name.
Keep the existing Mark row done mappings, including row_number. Do not sort or delete rows during a run: the update matches the row number captured at the start.
3. Choose one small input
Use these exact column names. The download contains the actual sample image URLs:
| Column | What to enter |
|---|---|
Title |
Demo Lip Color Kit for the example; required. |
Price |
29 for the sample, or the current price you want displayed. |
CompareAtPrice |
39 for the sample, or a genuine previous price; leave empty for no discount. |
ImageUrl1 |
Public main-photo URL; required. |
ImageUrl2 |
Optional second public-photo URL. |
Tagline |
A short, accurate product message. |
Status |
Leave empty for a pending row. |
VideoUrl |
Leave empty; the workflow writes the completed link. |
The workflow takes the first row with an empty Status. Any nonempty Status skips a row. An incomplete first pending row stops the run, so correct it before expecting later products to be selected.
Open Config and check the first-run values:
| Setting | Shipped value | First-run choice |
|---|---|---|
source |
sheet |
Keep sheet. |
dryRun |
false |
Change to true. |
brandName |
NORTHBOUND |
Keep for the fictional example; replace before commercial use. |
storeUrl |
Sample storefront | Replace with your own address before using the result. |
brandColor / brandAccent |
Dark ink / coral | Keep initially, then review your palette. |
musicUrl |
Sample soundtrack URL | Set to an empty string for a silent test, or use audio you may use. |
pollSeconds / timeoutMinutes |
10 / 20 |
Keep the polling interval and wait limit. |
Prices are supplied values, not inventory or currency checks. The savings badge is calculated from Price and CompareAtPrice; the workflow does not invent an offer. Check the displayed amount and currency before publishing.
4. Preview the product and check the estimate
With dryRun: true, click Execute workflow. The workflow reads the row, builds its design, validates it, and attempts to save a draft in the Zvid editor.
Open Dry run summary. Check product, price, savePercent, photosUsed, videoSeconds, creditsRequired and warnings. Open editorLink to inspect the saved draft. If the field is empty, inspect Save draft to editor; a valid quote does not guarantee that the draft was saved.
Review all three scenes for product identity, photo framing, title, offer and store address. An editor draft is not a finished MP4. Changes to that saved draft do not modify the builder inside n8n; make recurring design changes in Config or Build project JSON.
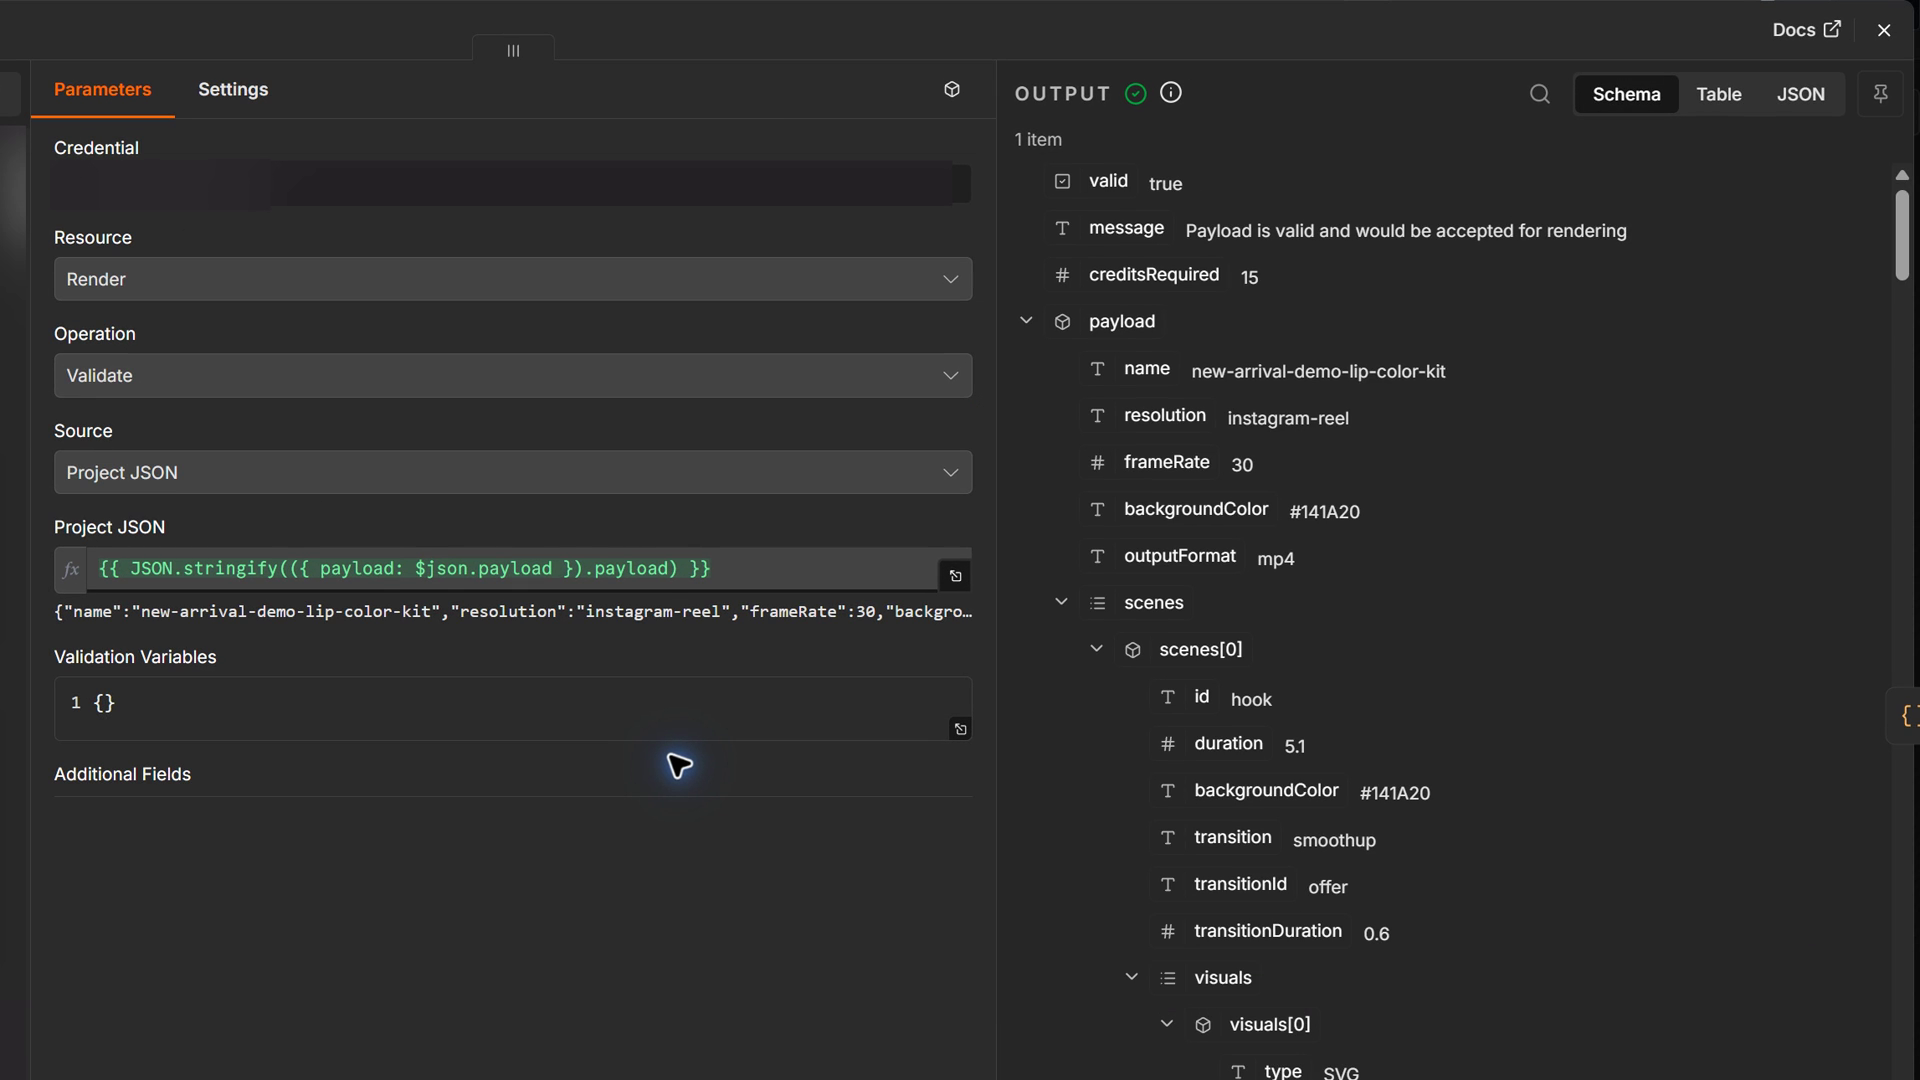
Validation does not consume render credits. In the sheet preview, Status and VideoUrl stay unchanged, so the same row remains available for rendering. The paid branch validates and proceeds automatically; it does not pause to ask you to approve the quote.
5. Render, watch and save
Set dryRun to false and execute again. Submit render creates a paid job. Wait, Get render status and Render finished? poll until completion. Still rendering? reports failures or a timeout.
Keep the execution with its accepted job ID. On success, Mark row done updates the selected row and Run summary reports videoUrl, jobId, product details and music status. Its creditsCharged field repeats the validation quote; use your Zvid credit history for the account transaction.
Open ▶ Watch video → Binary → data → View to play the MP4 in n8n. Use the download control to save it, or open videoUrl from Run summary and save through the browser's video controls.
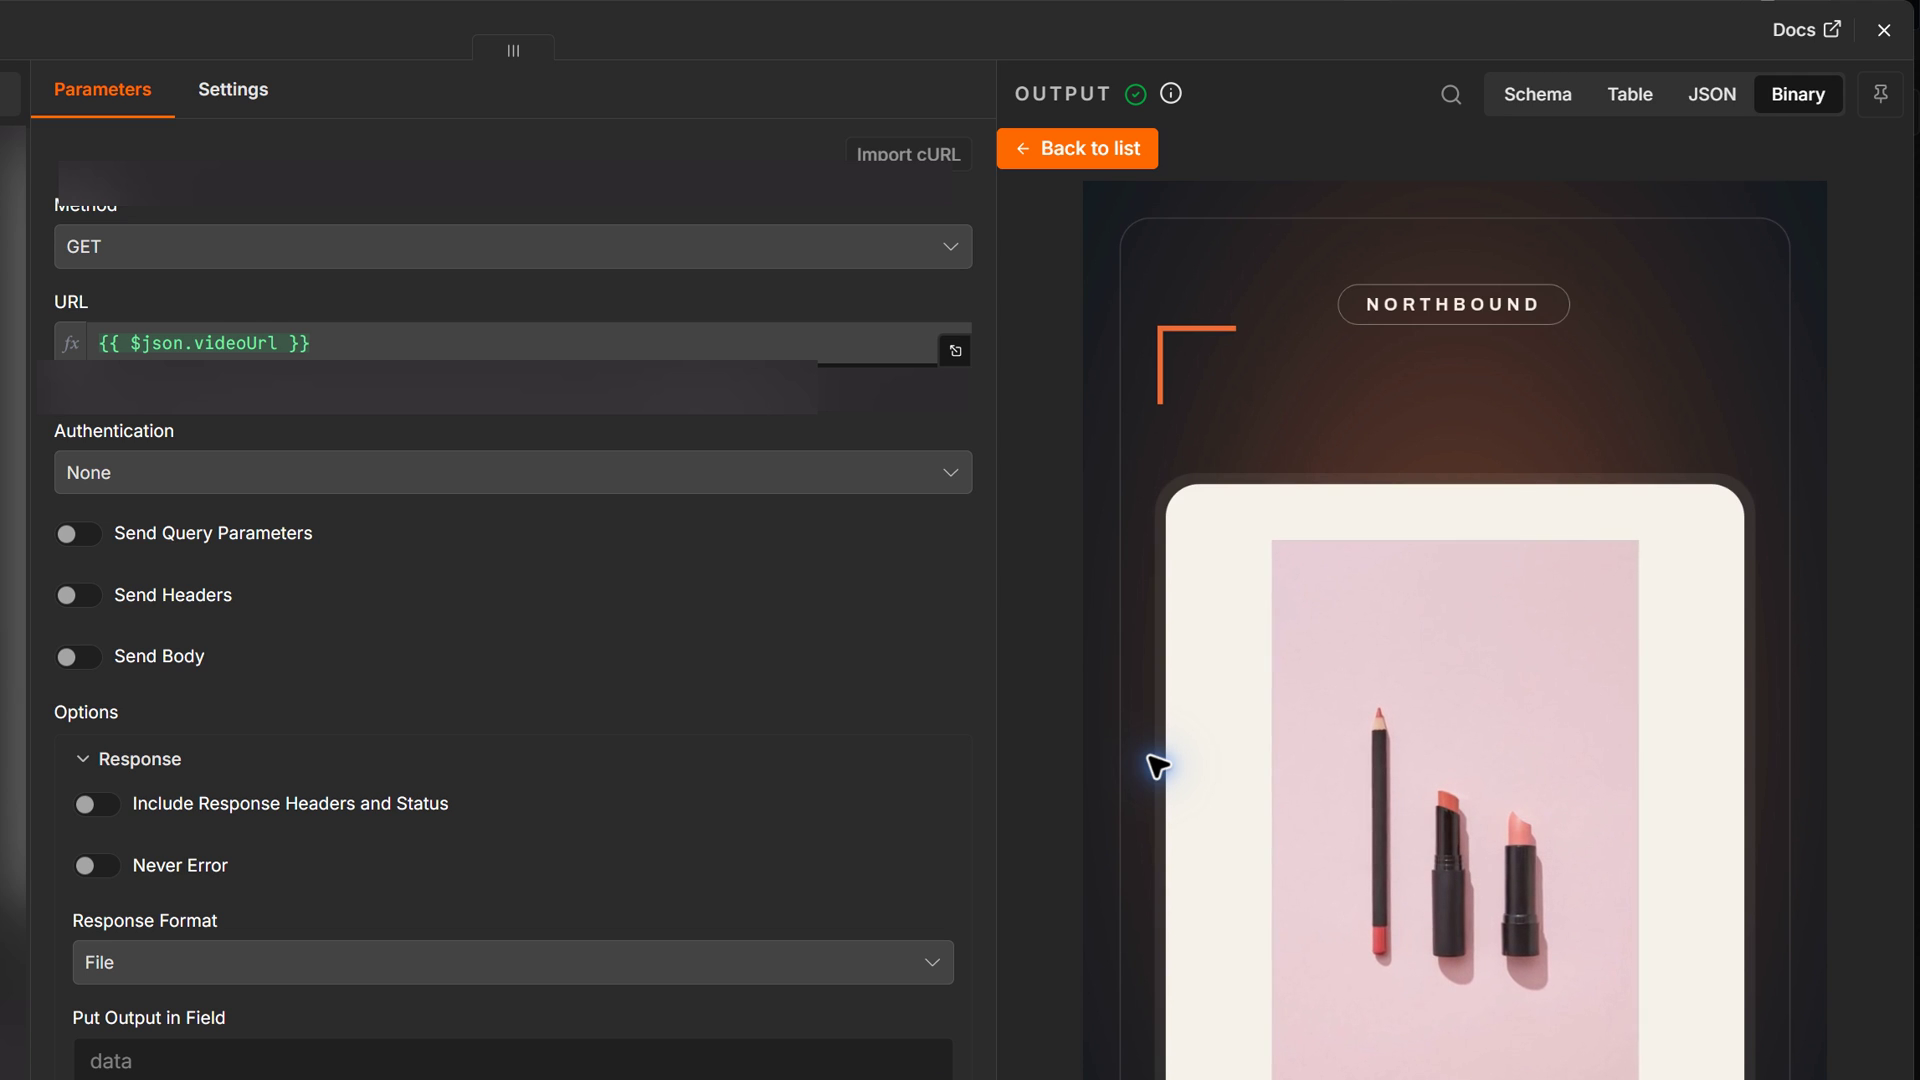
Confirm that the matching row has Status: done and its VideoUrl. If Watch video fails to download, inspect the summary and sheet first: rendering and write-back may already have succeeded. Retry the existing output URL instead of submitting another job.
If polling times out or submission is uncertain, inspect the saved job in app.zvid.io before retrying. A timeout does not cancel a render. Zvid's retry guidance explains how to avoid duplicate paid jobs.
6. Use the reviewed result
Upload the accepted MP4 manually to your social channel, ad manager or Shopify product media. This workflow has no automatic publishing branch or external approval pause.
Put the working product link in the post, ad destination or surrounding page. The address and button drawn inside the MP4 are pixels and cannot be clicked.
Download outputs before expiry. Output availability depends on the plan recorded for that render, and the job response supplies outputExpiresAt. A URL in a sheet is not permanent storage.
Connect Shopify, then schedule carefully
Obtain Shopify access
For an app and store in your own Shopify organization, open the Dev Dashboard. Choose Apps → Create app → Start from Dev Dashboard and name it. Create a version with the read_products scope and use https://shopify.dev/apps/default-app-home for a background app's URL. Release the version, choose Install app, and approve installation on your store. See Shopify's Dev Dashboard guide for those controls.
In app Settings, find the Client ID and Client Secret. Open Bash, such as Git Bash on Windows, and run these prompts. Enter only the shop subdomain, such as my-store. The secret prompt hides what you type, and the values stay in this shell session:
read -r -p "Shop subdomain: " SHOPIFY_SHOP
read -r -p "Client ID: " SHOPIFY_CLIENT_ID
read -r -s -p "Client Secret: " SHOPIFY_CLIENT_SECRET
printf '\n'
In the same shell, exchange those values for an access token:
curl --request POST \
  "https://${SHOPIFY_SHOP}.myshopify.com/admin/oauth/access_token" \
  --header "Content-Type: application/x-www-form-urlencoded" \
  --data-urlencode "grant_type=client_credentials" \
  --data-urlencode "client_id=${SHOPIFY_CLIENT_ID}" \
  --data-urlencode "client_secret=${SHOPIFY_CLIENT_SECRET}"
Copy the returned access_token, not the Client ID or Client Secret. Keep the response private; check scope and expires_in. This grant applies to stores in your own organization. Another merchant's store needs its appropriate Shopify authorization flow. Shopify's token guide includes a Node.js request example.
Create an n8n Header Auth credential: Name X-Shopify-Access-Token, Value your access token. Attach it to Poll new products. In Config, set source to shopify, shopDomain to the subdomain alone, and apiVersion to a supported version such as 2026-10. The original download contains 2024-07; do not rely on that old version. Execute Config, then Poll new products, and check for a successful product response before enabling the full route.
This branch uses Shopify's legacy REST Product endpoint. New public Shopify apps must use GraphQL. A new public app or comprehensive catalog queue needs a different integration design.
Know what the poll selects
The request asks for five products ordered by creation time, then uses only the first. It does not filter for active or published products, process every unseen product, or react to edits. Check that the newest record is ready to advertise. Several additions between polls can cause intermediate products to be skipped; use the sheet queue when every approved product needs a video.
The first production-triggered Shopify run records the newest ID and renders nothing. A later run renders when that newest ID changes. After success, the marker moves to the rendered product. This prevents a first-run catalog burst, but it is not permanent history of every processed product.
The marker uses n8n workflow static data. Manual tests do not persist it. Test credentials and design manually, then verify the first scheduled execution and its seededShopifyMarker result. Shopify mode does not update Google Sheets.
Client-credentials tokens expire after about 24 hours; use the response's expires_in. This template stores a fixed token and does not renew it. Request a fresh token when needed for manual use. Before unattended scheduling, add secure renewal and make the Shopify request use the renewed token.
For sheet mode, open Every 30 minutes, choose the minutes interval, check workflow timezone and publish/activate after reviewing one complete result. Avoid overlapping executions: two runs can select the same pending row before either writes done.
Customize one product before increasing the queue
Change branding, displayed store address, call to action and colors in Config. Set fallbackTagline to your own short message. Long titles and taglines can be reduced or trimmed; Shopify HTML descriptions become plain text.
Use publicly accessible image files rather than a Drive sharing page. Review tall, square and wide photos. Add a second photo for another angle. The music check can omit an unreachable or oversized soundtrack; inspect Run summary.music if the video is silent. The workflow does not generate narration or photography.
A finished video does not update when a price or offer changes. Create a deliberate replacement and remove outdated versions wherever they were used. Do not clear completed Status values merely to retry a failed download.
Costs and practical limits
The 14.3-second, 1080 × 1920 example received a 15-credit quote. Ten videos at that quote would total 150 credits. This is planning arithmetic; validate your final design for its current cost and account limits.
Zvid credit calculation depends on duration and pixel area. Validation and editor previews do not consume render credits. n8n hosting and connected services have separate costs. This template contains no LLM or voice-generation step.
The n8n version has no per-run credit ceiling. The paid path automatically submits after validation. The Node.js companion adds an explicit --max-credits check before submission.
Troubleshoot the next action
| What you see | What to check |
|---|---|
Nothing to render in sheet mode |
Find a row with empty Status; completed rows are skipped. |
Row N has no Title or Row N has no ImageUrl1 |
Fill that pending row or put a skip value in Status. |
A quote but no editorLink |
Inspect Save draft to editor; the summary can survive a draft-save failure. |
Shopify HTTP 401 or 403 |
Check token expiry, app installation and read_products. |
Shopify HTTP 404 |
Check the subdomain and supported API version. |
| First-run Shopify message on every manual test | Static data is not saved by manual tests. Check a production-triggered run. |
| Completed video but unchanged sheet | Check spreadsheet, tab and row number; reuse the completed URL for write-back. |
| Render timeout | Inspect the accepted Zvid job before another paid submission. |
Prefer Node.js?
The companion runs independently of n8n using the official @zvid/sdk. It accepts a local JSON product row or polls Shopify, builds the same design, validates, saves the accepted job ID and waits for completion. It does not connect to Google Sheets, save an editor draft, refresh Shopify tokens or publish videos.
Install Node.js 20.12 or newer, extract the ZIP, and open a terminal in shopify-product-promo:
npm ci
npm run check
npm test
npm run offline
Offline mode builds out/sample/project.json without API calls. Copy .env.example to .env, enter ZVID_API_KEY, and run:
npm run dry-run
npm run sample -- --max-credits 20
The first command validates the sample. The second renders only when its quote is at or below 20 credits. The Node.js configuration uses a silent soundtrack; add permitted audio if wanted. That choice and the ceiling belong to this companion, not every Zvid integration.
Open out/sample/result.json for videoUrl, then play and download the MP4. Recover an interrupted wait without a second submission:
npm start -- --resume --out out/sample
For your own product, copy data/product.json, use the same fields and leave Status empty:
npm start -- --input data/my-product.json --dry-run --out out/my-product
npm start -- --input data/my-product.json --max-credits 20 --out out/my-product
For a Shopify poll, set SHOPIFY_SHOP_DOMAIN and SHOPIFY_ACCESS_TOKEN, then run npm start -- --shopify --max-credits 20. Its first non-preview run saves a starting marker without rendering. Later runs can select a changed newest product. The local marker is separate from n8n's marker; the tools do not coordinate duplicates. The README explains recovery and archiving a completed result while retaining the marker. Let one system own the production queue.
Start with one result
Download the workflow, install the Zvid node, connect the sample sheet and set dryRun: true. Review the quote and editor draft, render one promo, then check the saved row and full video before adding more products.
Frequently asked questions
Does this workflow create a video instantly when I add a Shopify product?
No. The optional Shopify source polls every 30 minutes by default. It examines the newest created product and can miss intermediate additions. Use the sheet queue when every approved product needs a video.
Can I try this product promo template without a Shopify store?
Yes. The default Google Sheets route needs n8n, a Zvid API key, a Google connection and a product row. The fictional sample supplies the required headers and usable photos.
Does dryRun prevent paid rendering in this template?
Yes, dryRun: true routes the selected product through validation and an attempted editor-draft save without submitting a render. The download ships with dryRun: false, so change it before executing if you want a preview.
Why does the first Shopify execution create no video?
The first production-triggered Shopify execution saves the newest ID as its starting marker. Later executions can render when that ID changes. Manual tests do not persist static data, so repeated tests can keep returning the first-run result.
Will this template post to social media or attach the video to Shopify?
No. It returns the completed MP4 and writes the URL to the source row in sheet mode. Review and upload manually, or build a separate publishing step that consumes the existing completed output.
Does the Shopify access token refresh automatically?
No. Both implementations use the token you configure. Client-credentials tokens expire after about 24 hours, so unattended use needs secure renewal. Other authorization flows have their own token lifetimes.
Why did another run select the same product?
Check whether the previous run completed its write-back or marker update. Overlapping runs, failed write-back, cleared Status values or nonpersisted Shopify test markers can allow reselection. Inspect the existing job before submitting again.
For Zvid help, visit https://zvid.io/contact.